Travelogue

Trekking Mount Rinjani When It Erupted!

Trekking Mount Rinjani When It Erupted!

Yes no joke, we really witnessed Mount Rinjani erupting during the trek! It was one of the most amazing happenings ever in our lives! I’ll also be dropping useful tips along the way as well, so read on especially if you’re planning on trekking Mount Rinjani!

Here it goes….

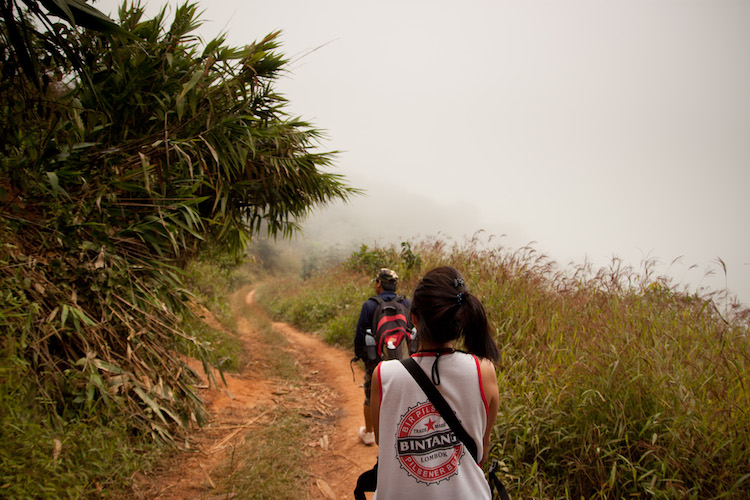
The trek started off pretty easy, almost flat ground and clear trail. As you can see from the photo below, it was quite foggy and cold actually! But because we were constantly on the move, we didn’t feel that cold yet.

IMG_8712

Lunch break! Sweet hot tea is damn shiok in such a cold weather!

IMG_8771IMG_8783

And then it slowly got colder as the day progresses. Towards the mid afternoon, it started drizzling!

Useful tip: Remember to bring a good waterproof windbreaker! Useful in fending of the cold wind as well as the rain! 

IMG_8820

Finally after almost 8 hours of arduous climb, we reached our base camp! We travelled with porters and they helped carry our tents and food. So by the time we arrived at our base camp, the tents were already set up and dinner was almost ready! Look at how foggy it was!

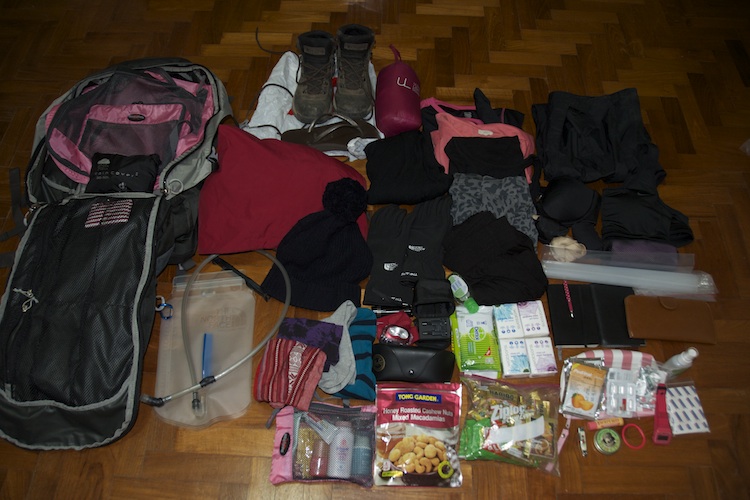
Useful tip: bring along gummies or chocolate bars (mini snicker bars highly recommended!) to munch along the way while trekking! You’ll definitely need that boost of energy! 

IMG_8845

But thankfully the fog cleared for awhile and we could take a nice shot with the crater of Mount Rinjani. No this is not the summit, unfortunately. The weather got really bad at night and when we were supposed to wake up at 3am for the summit climb, it was practically a thunderstorm! The wind was howling and the rain was crazy!  It was almost impossible to hike up the summit in that weather! Plus i heard from others that the summit climb was actually really challenging. Our leader later informed us that the summit climb has to be cancelled 🙁

IMG_8962

We made our way down to the crater lake the next day. I remembered it to be quite challenging actually as the terrain was mostly volcanic ash and sand and it was really slippery! Half the time i felt like i was skiing on sand.

Useful tip: Remember to apply lots of sunblock! When descending, the sun will be directly shining at you and it’s a killer! 

27700_10150197841725564_1725947_n

Finally we reached the crater lake where our tents have again already been pitched for us! This is really such a privilege that i appreciate so much! Imagine having to pitch your own tent when you’re already so exhausted and just wanna rest! But that’s what Daniel and me usually have to do like for example when we were doing the cycling expedition in New Zealand.

Some of us jumped into the crater lake for a dip! The water was freezzzinnggg cooold! But also very shiok as throughout the 4 days trek, you won’t get to shower! Hence this was the closest that we could get to a shower.

IMG_9016IMG_9046IMG_9053IMG_9085

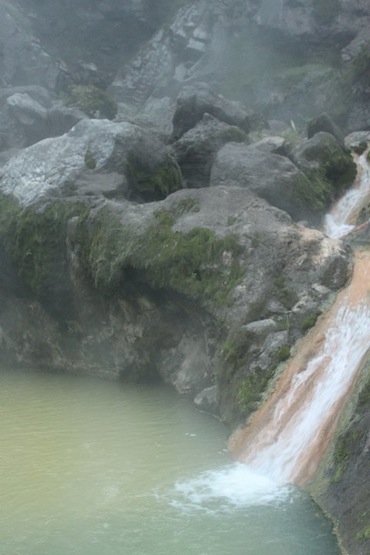
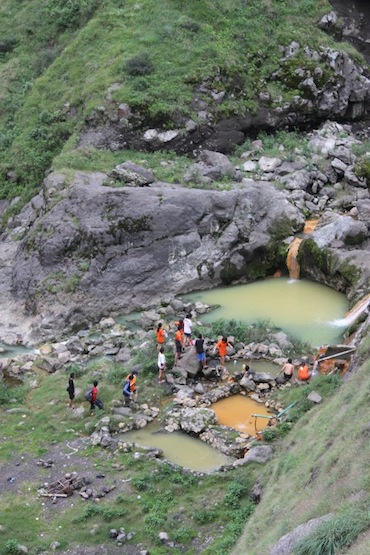
We also did a short detour to a natural hot spring. The smell of sulphur was so pungent!

27700_10150197838275564_4864229_n27700_10150197837765564_5161745_n

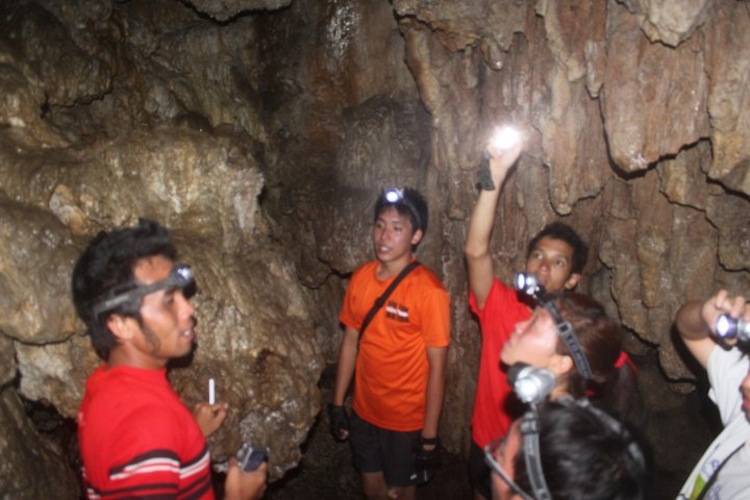
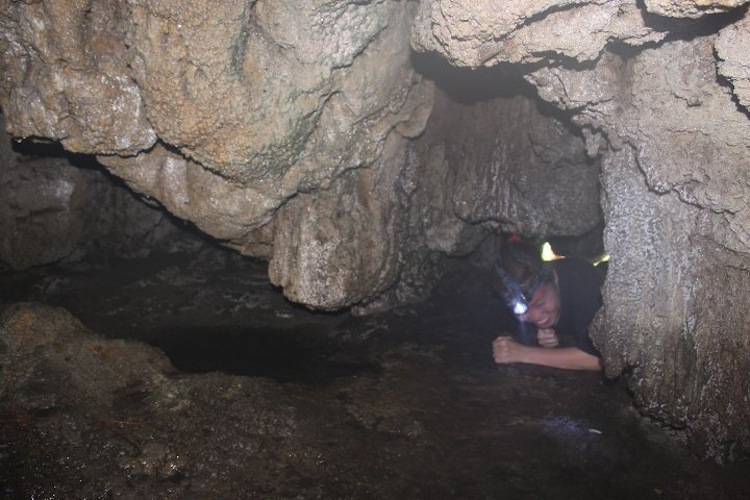
And our guide also brought us to this small cave which had nothing much inside. It was a very small opening into the cave though, we literally had to leopard crawl in.

27700_10150197837360564_4544144_n 27700_10150197837035564_7821223_n

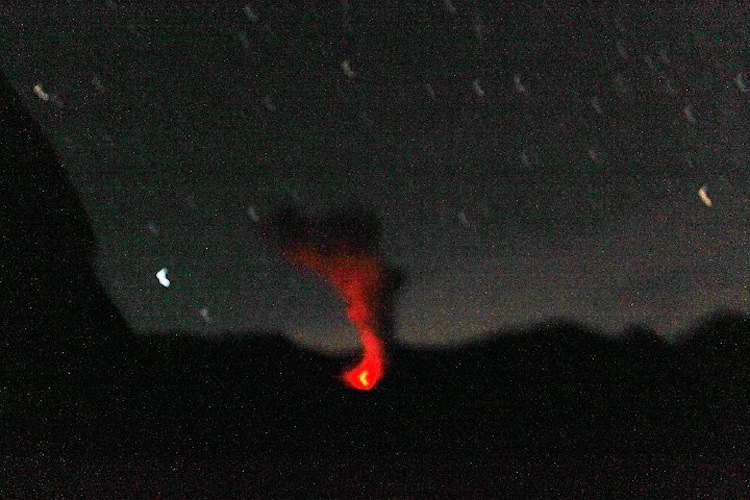
And that very same night when we were sleeping in our cozy tent, we heard a super loud rumble! We immediately got out of our tent to check out what happened! This was what we saw! As it all happened too quickly, Daniel wasn’t able to adjust his camera mode properly and hence this was the best shot that we got of the lava erupting out of the volcano! It was pitch dark outside and all we could see was the bright red lava that stood out among the black sky! It was sooo amazing as we stood there in awe…still not believing what we just saw.

27700_10150198567445564_2235938_n

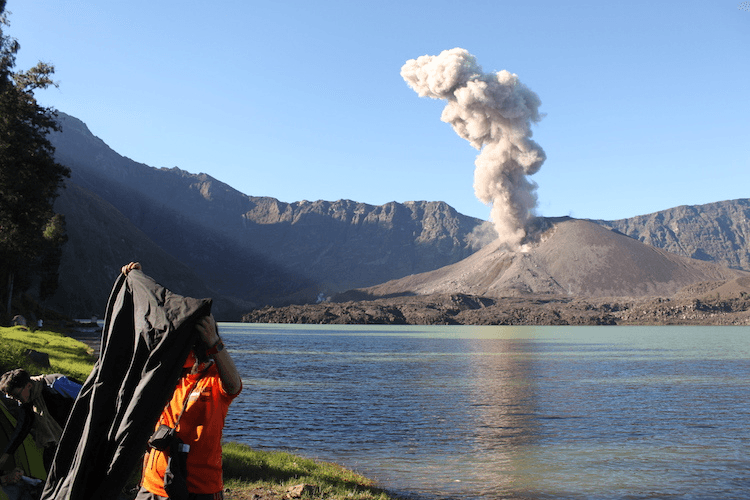
But that amazement lasted us only for that night. The next day, the volcano continued to erupt multiple times till we became oblivious to  it. Look at us just packing our stuff as though nothing has happened when in the background, the volcano was still erupting!

IMG_9201IMG_9088IMG_9144Our awesome porters! IMG_9311Beautiful RinjaniIMG_9409

Ooh and lastly beware of leech bites! That happened to our friend…very gross right? Thankfully i didn’t get bitten by any leech though!

Useful tip: To get rid of a leech, try not to use the usual methods like burning or adding salt to it as it can result in the leech regurgitating into the wound and causing infection much worse than the leech bite itself!  You should instead use fingernails or any sharp object to push along the suction between the skin and leech to slowly break the suction of the leech. Once the suction is broken, the leech will detach its jaws. Alternatively, you can just let the leech complete its meal on your blood until it satisfied its appetite, and the leech will detach itself and fall off automatically. 

Overall this was a really tiring but fun trek! Though at that point of time i was telling myself, no more of such torturous stuff! Once in a lifetime is enough! But after you return, the sense of satisfaction is so great that it’s enough to make me want to put myself through such torture again! Read about our experience on climbing Mount Kinabalu!

Do share below in the comments if you’ve had such a similar experience before too! Any other recommended places for us to trek next?

Diving in Bali with Giant Fishes!

Diving in Bali with Giant Fishes!

So recently, Daniel and i went on a leisure dive trip with our friends at Tulamben in Bali with Tulamben Wreck Divers! It was our first time diving in Bali with giant fishes and definitely one of the most memorable dive trip for us thus far! We saw sooo many magnificent and awesome sea creatures! Ranging from cute tiny little Pygmy Seahorse to huuuugeee Bumphead Parrrot Fish! Visibility was also very good! We did a wreck dive, wall dive, coral garden dive and night dive. Total of 6 dives in 2 days!

Highlights of our leisure dive escapade in Tulamben!

Wreck Dive. This was a hugggge ship that was docked at the shore when it sunk! Hence it was really near to the shore. We could just swim from the shore to the wreck itself. It was a little scary as we glided through small holes of the ship and explored within the ship itself…but very fun! It was really a test of our buoyancy. Also, we spotted schools of huge bumphead parrot fish and other fishes during our second dive at the wreck!

Dive 088
All hail the captain!Dive 499Dive 450Dive 445Dive 461
Photobombed by the fish!Dive 315Dive 306

Coral Garden Dive. Spotted really colourful fishes, pretty nudi branches and the rarely sighted Pygmy Seahorse!

Dive 353Dive 042Dive 493Dive 242Dive 220Dive 194Dive 198Dive 180Dive 150Shrimp helping to clean teeth!Dive 128

Wall Dive. Very fun to see the fishes swimming vertically as they assume the vertical wall is their seabed!

Dive 109

Lastly, photos of us. Our dive master made us take awkward photos with sea fans and random corals.

Dive 466Dive 234

Oooh and to end this post, we saw this lady free diving! Looked damn cool! Apparently you can go up to 40m free diving (without your oxygen tank). Definitely going on our bucket list! 😀

Dive 335

Important information

*For those heading to Bali, do note that there’s a airport tax fee of 200,000 Rupiah when departing!

Tulamben Wreck Divers

Daniel and me chose the Fun Dive package that cost USD$285. Fees included:

  • 3 nights in Penthouse Suites (free upgrade from superior room) with air con, hot/cold water, fridge, daily breakfast, free wifi, tax & service.
  • Arrival and departure transfers from Bali Denpasar Airport
  • 6 day dives with dive guide and dive gear, except BCD & reg which can be hired for US$5 per item/per person/per day
  • Tulamben porter fees and dive tax

For those of you keen on taking your dive certification in Tulamben, do check out the detailed post by my friend, Hendric, at his website! He and 2 other friends took the advance dive course there and had an awesome experience! 🙂

Hope you enjoyed viewing our dive photos! Do share in the comments below if you’ve dived in Bali before too or are planning to make a trip to dive in Bali soon! 🙂

Climbing Mount Kinabalu Via Ferrata!

Climbing Mount Kinabalu Via Ferrata!

Here’s a recount of our experience climbing Mount Kinabalu’s Via Ferrata route! Our team being spontaneous and fearless, we decided to take on the challenge of descending Mount K summit’s Via Ferrata – Low Peak Circuit route without much thought put into it. We didn’t really know what we signed up for actually, we just agreed and paid for the package. And only realising what we’ve committed to like 1-2 weeks before the actual climb. We were all freaked out, or at least i was!

“Basically the via ferrata route is a  protected mountain pathway consisting of a series of rungs, rails, cables and bridges embracing the rock face. It allows access to scenic sections of the mountains that are typically available only to rock climbers and mountaineers.Designed for the brave and active with above-average fitness levels, this 4 – 6 hour route with an optional summit attempt includes rest stops at scenic locations.”

**It’s deeply saddening to receive the news about the recent incident that struck Mt K. If you wish to contribute to the families of the mountain guides that passed on during this incident, please donate directly at www.ilovesabah.com. This is a fund raising initiative by Amazing Borneo, one of the tour agencies that organises treks to Mt k. All proceeds will go directly to the families of the victims.  The via ferrata has been now rebuilt with an exciting new route! The tips and experiences we have below still applies! 

FV7A2598

When you reach Pendant Hut (base camp for Mt K), there will be a compulsory briefing at 3pm for all trekkers who will be doing the ferrata route. During this briefing, the trainer will teach you how to put on your harness as well as what you’ll have to do during the ferrata route itself.

FV7A1867

One key point to take note of for the ferrata is that, you MUST  reach the starting point of the ferrata by 7.30am. I’ve heard that they’re really really very strict and even if you’re 1 minute late, they will not allow you to do the ferrata. With that in mind, we literally raced down the summit! We were afraid that we will be late for it. In the end we were 30 minutes early -.-

So anyway, here’s us, all getting ready to start on the ferrata! As you can see, i was really quite scared. Tip: don’t forget to apply sunblock all over your face and body! I was wearing my windbreaker initially, but eventually it got so hot and i removed it. The sun was directly shining on us against the cliff face that we were climbing. I could feel my skin getting burnt! And i forgot to apply sunblock on my arms 🙁 Resulting in ugly tan lines!

FV7A2564FV7A2586FV7A2602FV7A2604FV7A2606FV7A2608

There are basically 2 types of ferrata routes that you can choose from. 

1. Walk the Torque

This is a shorter and simpler version of the ferrata and can be completed leisurely within 2-3 hours. Length of route is only 430m. You’ll still get a taste of the ferrata and get to try out a few obstacles such as the  2 cable Monkey bridge,  Tyrolean traverse &  Balancing beam (you’ll get to do all these in the low’s peak circuit too!)

2. Low’s Peak Circuit (we did this)

This is the more challenging and tougher route. Total distance is 1.2km! Almost 3 times longer than the “Walk the Torque” route. You’ll need an estimated 4-6 hours to complete this. The low peak circuit will eventually connect to the walk the torque and hence you won’t miss out on anything.

Our take on the ferrata:

I personally feel that if you just want to get a taste of the ferrata, the Walk the Torque route is good enough. For the low’s peak circuit, the obstacles are repeated and each obstacle is extended for quite a long time. After awhile it gets repetitive and a little boring actually. To add on, the bright and unrelenting sun spared no mercy on us, zapping away whatever little energy that we’ve left! Not to mention, by the time you’ve summited Mount kk, you would already have been super exhausted. If you’re doing the Low Peak Circuit, you’ll still need to expend an additional 4-6 hours of energy to complete it. And we’ve not even taken into account the remaining amount of time and energy needed to descend the mountain. For us, we started our summit climb at 2.30am, and only finished everything only at 5.30pm (including the ferrata as well as descending to the bottom of the mountain). That’s 15 hours of almost non-stop climb. No joke. we could barely feel our legs after that.

By the way, for those of you who still can’t imagine what the via Ferrata is all about, watch the Mount Kinabalu Via Ferrata video that my friend did! (Warning: not for the weak hearted or those with a fear of heights!)

Essential Info

How to book the ferrata:

We booked our package with Amazing Borneo. You may check out the different packages that they have on their website. We decided on the 3D2N Mount Kinabalu Climb With Ferrata & Highland Resort Star (Low’s Peak Circuit).

How much does it cost?

For Malaysians, it costs RM1560 for the package as stated above and for foreigners, it costs RM1660. That works out to an average of $650/pax using the exchange rate of $1:RM2.5.

What to wear/bring for the ferrata:

1. Gloves with good grip would be very useful. You’ll need to grip on to the ropes quite often and gloves would be useful in preventing rope burns.

2. A light windbreaker would be good in shielding you from the scorching sun and at the same time from the occasional cold breeze.

3. Trek shoes with good grip. Very important as you’ll need the shoes to grip onto the rock surface to prevent you from slipping down.

4. Wear a comfortable set of light weight clothings. Preferably long pants as it’s likely for your knee to graze against the rock surface while doing the ferrata.

4. Avoid accessories such as caps, sunglasses or any other thing that might fall off easily. You have enough things to worry about already when doing the ferrata and you wouldn’t want any more distraction.

5. Of course, remember to wear plenty of sunblock.

6. Bring at least 1 litre of water. The low’s peak circuit will take at least 4-6 hours to complete and you’ll need enough water to last you through the entire ferrata climb. There’s no water point during the ferrata.

That said, this was definitely one memorable experience for all of us, both mentally and physically. The view from above the clouds was simply breathtaking and those times are moments that i will always cherish. Read here for our full experience on climbing Mount Kinabalu!

5 Things You Must Bring to Climb Mount Kinabalu

5 Things You Must Bring to Climb Mount Kinabalu

Before you climb Mount Kinabalu, do a quick check on your packing list to ensure that you have the following 5 items. Based on our experience, these are the 5 things that you must bring to climb Mount Kinabalu.

1. Headlight

FV7A2407

This is a compulsory item stated by our guide. Best if it’s waterproof or at least splash proof as it’s almost always raining at the summit of Mount Kinabalu. This headlight will be very useful in illuminating your path when climbing the summit as well as for your friends or guide to locate you. It’s almost pitch dark and with the rocky terrain, it can get quite dangerous if you can’t see. Mine is the Petzl brand and i got it from Outdoor Life @ Velocity in Singapore, cost me around $35. Other brands like Energizer are not bad too, and cheaper. 

2. Waterproof gloves

FV7A2602

This is not compulsory, but i would say it’s definitely a must have if you’re doing the Ferrata. Read our Ferrata experience here! But it’s also a good to have when climbing the summit as certain parts of the climb will require you to hold on to a rope to pull yourself up. Best if it’s waterproof so that your gloves don’t get soaked wet when it rains and it’ll still be able to keep you warm. These gloves will help prevent rope burns! My waterproof gloves are from The North Face and are from Outdoor Life at Velocity, Singapore. Cost around $70. Expensive but worth it.

3. Warm Clothing

FV7A2376

A good waterproof windbreaker, fleece jacket and a beanie would suffice! At the start it’s sufficient to just put on your windbreaker as it gets quite hot once you start climbing. But as you ascend, it gets colder and you’ll need your fleece jacket and beanie. Temperatures near the summit can go as low as -3 to 5 degree celsius!

4. Good trekking shoes

FV7A2598

I can’t emphasize how important this is, you will really need proper trek shoes with good grip when climbing Mount Kinabalu, especially if you’re doing the Ferrata. When it rains, it gets really slippery! Especially when nearing the summit when it gets very steep. The soles of 2 of my friends’ shoes came off after a whole day of climb! Luckily the guides were very helpful and glued the soles back to the shoes. For Ferrata, you can see from the above photo that most of the time, you’ll be climbing at an angle. You will need a strong grip when scaling across the mountain sides. My shoes are Columbia, Women’s cut, mid cut. Cost around $169, from Velocity, Singapore. 

5. Panadol

1926271_10152245221340661_486212132_o

I know this is underrated and people might miss this out. But it’s almost inevitable that you’ll get a headache from altitude sickness during your first day of climb. You’ll have to climb to a very high height within a very short time span. Your body hardly has time to acclimatise, hence the headache. For me, thankfully my headache was pretty mild and i only had to pop 2 panadols and it subsided. For some other less fortunate climbers, their symptoms are more severe and suffer from nausea, vomiting or giddiness.  

Of course there are other items that you’ll have to bring as well besides the above 5 must haves. Here’s my full packing list for the Mount Kinabalu climb.

packing list

I tried my best to pack as light as possible but my bag still weighed around 7kg. Remember, every gram counts when you’re climbing Mount Kinabalu!

– Trek bag (I will be doing a review soon on the Osprey Farpoint 55 that i used for the climb)
-Day pack (very useful for summit climb)
-Packing cubes x 3 different sizes
– Extra ziplock bags
– Trekking shoes with good grip
– Slippers (Actually not very necessary as waterproof crocs-look-alike slip ons are provided at the base camp.)
– 2 litres water bag (very useful when climbing. It’s so much more convenient to drink from the water bag tube as compared to your usual water bottle.)
– 1 Dry fit top
– 1 Waterproof trek pants
– 1 Set of sleeping attire
– 1 Set of normal clothing (to change out of your trekking attire)
– 3 Sets of undergarments
– 1 Waterproof windbreaker
– 1 Lightweight downjacket
– 1 Fleece hat
– 2 Pairs of socks
– Waterproof headlight
– Waterproof gloves with good grip
– Microfibre towel (towel not provided at the base camp)
– Toiletries (shampoo, soap, facial cleanser, face moisturizer, sunblock, powder, tooth brush, tooth paste)
– Snacks
– Medication (panadol/altitude sickness pills/plasters/diamotil/etc)
– Lip Balm (the air is really dry up there)
– Visor (used a visor to shade from the sun instead of sunglasses)
– Tissue paper/wet wipes/hand sanitizer

For those of you that missed our earlier post, read here for our experience on climbing Mount Kinabalu! Let me know in the comments below what other essential items you’ve packed for Mount Kinabalu that we’ve missed out! Or any other useful tips on items to pack for Mt Kinabalu!

Up Up and Away! Hot Air Balloon over Bagan

Up Up and Away! Hot Air Balloon over Bagan

This is definitely another highlight of our Myanmar trip – on a hot air balloon over Bagan!FV7A0246

It was both our first time being in a hot air balloon and the experience was truly exhilarating! From the moment they started blasting fire into the balloon (we were so amazed at how the fire was almost touching the sides of the balloon but it didn’t of course), to the taking off of the balloon. It was just so indescribable! Random fact, the entire hot air balloon was really big and heavy! It required more than 10 guys to hold it up and to keep it stable. I was so amazed at how something sooo big and heavy can rise just using hot air!

FV7A0151FV7A0156FV7A0160FV7A0152

The view from above was really majestic. The timing was also perfect. After our balloon started rising, we were wondering if we’ve missed the sunrise as it was already 7am and the sky looked quite bright. But before we knew it, at the corner of our eyes, we saw a large glowing sphere rising slowly into the sky, casting sunbeams across the thousands of pagodas.

FV7A0195FV7A0239FV7A0285FV7A0279FV7A0289FV7A0311

Overall, as you can see from our happy faces, we were really pleased with the professionalism of Balloons Over Bagan. It’s actually a British operated company and we felt assured of our safety throughout the ride. Everything was well thought of and they even gave us a cap each to shade our eyes from the glaring sun. After the ride, we were presented with champagne/lime juice, croissants and banana cake! Awesome service! Only con is the price tag that came along with the awesome service. We paid $320 each. But for the awesome experience, i would say it’s worth every penny spent!

3D2N Trek in Hsipaw plus Homestay

3D2N Trek in Hsipaw plus Homestay

FV7A9917

One of the highlights of our Myanmar trip was really the 3d2n trek in Hsipaw. The scenery was simply breathtaking and stunningly beautiful, kinda of helped take the fatigue away from trekking. Also, it was really fun trekking in a big group, there were about 7 of us. We took turns talking to every person in the group and got to know each other better.

We booked our 3d2n trek at Mr Charles Guest House and our guide was “Kyaw Kyaw” (pronounced as Jo Jo). There are of course shorter and easier options for those who prefer a shorter trek. Just tell the trek agent what your preferred trek options are and he’ll recommend you accordingly. We paid 40,000 kyats (approx $40) each for the 3d2n trek, accommodation and food all inclusive, except for water. But anyway you’ll be able to get bottled water easily from the villages and it’s really cheap too. Both nights were spent at a different village.

Highly recommend our guide, Kyaw Kyaw (“Jo Jo”) to anyone who’s keen to take on this trek. Albeit being at a tender age of 22 years old, he’s really knowledgeable and never failed to keep us entertained with his never ending fun facts of the day. And to add on, he’s really funny and cracked all of us up with his jokes. In the picture below, he was telling us about the watermelon plantation and about how big the watermelons are here in Myanmar. As you can see, we were all still decked in our fleece jackets, scarves and all. It was around 8am in the morning and was still very chilly! But as the hours past, it got hotter and our layers of clothing got lesser.

FV7A1349

At one part of the trek, we had to cross an ankle deep stream and the water was really cold! It was quite refreshing actually after half a day of trekking under the scorching hot sun. By the way, i would really recommend to put on lots of sunscreen as the sky in Myanmar is almost void of clouds and you can feel your skin getting burnt by the minute.

FV7A1373

Finally after almost 6-7 hours of trekking, we reached the village that we were staying at for the first night! The first day trek was the most tiring compared to the remaining 2 days. It was mostly uphill on the first day and the weather was terribly hot! I was soooo happy after i caught a glimpse of the village from afar.

FV7A1382

Celebrating our first day with “Palaung Beer”. It’s actually green tea but our guide called it “Palaung Beer” because of its resemblance to actual beer. Palaung is the name of the village that we stayed at for the first night. In Myanmar, the locals grow their own tea leaves and drink green tea all the time. They hardly drink water actually. Every meal was served with hot green tea!

FV7A1383

A sumptuous meal awaited us! As the people in the villages were mostly Buddhists, our meals were vegetarian for all 3 days. It’s their culture to have a plate of crackers as part of their meal. We ate crackers at almost every meal until we got really sick of it. But the food was yummy!

FV7A1389

Another thing we enjoyed most about the homestay was the village kids. They’re the most adorable!

FV7A1356FV7A1407FV7A1424FV7A9207FV7A9230FV7A9233FV7A9250FV7A9242

We explored the village on our own and chanced upon this small convenient store. The guy in purple (owner of the store i think) at the corner was really talented! He could sing and play the guitar really well! We happily sat down and listened to him sing with lots of emotions while strumming the guitar at the same time. Shortly after, our guide and his friend dropped by and joined in the singing. It was really fun just sitting there watching them.

If you’ve watched our video, the soundtrack is actually an original song composed by the guy in the purple sweater. The song was about a girl that he loves and misses very much.

FV7A1427

After the sun has set, we returned back to our home and continued to chill with the rest while keeping ourselves warm by the fire. It was really cold at night! We were all freeeezing.

FV7A1449

Fortunately, the home provided us with 2 thick and warm blankets each and a mattress to sleep on. It was pretty comfortable actually and we were kept warm enough.

FV7A9896FV7A9178

While exploring the village on the second day, we passed by a school and a monastery.

FV7A9211FV7A9293

We spoke to a friendly monk who’s a novice leader and he invited us into the monastery. This is where the monks will gather twice a day (once in the morning and once at night) for their prayers. We initially requested to stay in the monastery on our second night, but they don’t serve dinner and didn’t have enough mattresses for our large group. However, if you’re in a small group or on your own, you might want to consider staying at the monastery. It’ll be quite an interesting experience i think !

FV7A9296FV7A9309FV7A9305

On the 3rd day, we were rewarded with a dip in the hot spring! Unfortunately we did not take any photos of the hot spring. It was actually more like a local bath rather than a touristy hot spring that you would have imagined it to be. Males and females were separated by a cement wall. It was quite cheap actually, around 200kyats/entry ($0.20). You could see plenty of locals there with their longyi wrapped around their bodies while holding a basket of toiletries. In the villages they do not have the luxury of  having hot water to shower with and hence this hot spring is really a blessing to them especially in the colder winter months.

And finally, we were on the last leg of the trek and our guide surprised us with a pickup truck to send us back to our guesthouse! The surprise also included cold icy refreshing beer for everyone!

FV7A9942

We would really recommend anyone traveling to Myanmar to go for this trek at Hsipaw. A great opportunity to soak in the local culture while homestaying at the village. I can’t compare with the “Kalaw to Inle” trek as we didn’t have enough time to do it, but based on other travelers’ reviews who have done both treks, they preferred the trek in Hsipaw as it’s a lot less touristy and commercialized. In fact, we hardly saw any other travellers besides ourselves while trekking! For those that missed our previous post, check out how we spent the rest of our days in Myanmar!

With that, i shall end my post with 2 photos of random cats that we saw during one of our coffee breaks.

FV7A9265FV7A9939

Detailed Overview of our 16 Days Backpacking Myanmar!

Detailed Overview of our 16 Days Backpacking Myanmar!

Below is a detailed overview of the route that we’ve taken, mode of transport used and our budget (we will be using US$ and the budget is meant for 2 pax) for the entire 16 days backpacking Myanmar.

Myanmar is really one of the most beautiful SEA countries that we’ve ever been to. Every scene is just so picturesque that even with an amateur iPhone camera, you’ll be able to capture really beautiful shots!

FV7A0129

Day 1-2: Yangon

We’re both not really big fans of cities, hence we only stayed a night in Yangon and traveled to Mandalay the very next day.  

How we got here:
Took the budget Jetstar airline from Singapore and arrived at Yangon International Airport. Paid around $220 each for our tickets.

Where we stayed:
We booked a room at  Yangon Regency Hotel,  127 Sin  Oh  Dan  Street,  Chinatown,  Downtown  Yangon via agoda.com. Better rates offered on agoda than walk ins.  Nice and clean hotel, great central location. Highly recommended by us if you don’t mind the slightly high cost.

What we did:
We took the highly recommended circle line train  that cost us only $1 each! The entire journey will take 3 hours, but we got bored after awhile and decided to alight at a random station. Do note that the train counter staff will scrutinise all of your $1 bills and reject any note with a slight fold or stain. It was quite ridiculous as some of the stains were really not visible and we didn’t even notice them at first. But i guess they’re really adamant about accepting only new and crisp dollar bills.

FV7A0216

How much we spent in total:  
Food – $51

Activities – $2 (circle line train)

Transport – $440 (airplane tickets for 2 pax)
$10 (taxi from Airport to Yangon Regency Hotel)
$7 ( taxi to bus station to head to Mandalay)
$0.20 (local bus)

Accommodation – $45 (1 night)

Others – $20 (local sim card)
$7.30 (we bought bought a traditional “longyi” each)

Total expenditure for 2 pax    $582.50

Average expenditure/pax – $291.25

Day 3-4: Mandalay

How we got here:
We took a VIP bus from Yangon to Mandalay via the JJ Express VIP Bus. The friendly staff at Yangon Regency Hotel helped us with the booking of bus tickets. Each ticket cost around US$16 and the entire journey took around 7 hours. The bus will stop for a short break every 2 hours. We were pleasantly surprised at how good the bus service is! There was even a “bus stewardess” who will serve you food and drinks during the journey. The seats were really spacious and comfortable. Not to worry about the freezing air-con as a nice and warm fleece blanket will be provided for you on board the bus.

Where we stayed:
We were lucky to be able to stay at one of the most highly recommended Guesthouse in Mandalay – Yoe Yoe Lay Guesthouse. Just see all of the positive reviews on their facebook page. The host, Nan Bwe (or affectionately known as “ma ma”) is one of the most warm, hospitable and friendly locals that we’ve met in Myanmar. The staff there are all very friendly and helpful and they serve the best breakfast ever. Best part of all, her guesthouse is one of the cheapest amongst the other guesthouses in Mandalay. We paid only US$10/night for a single bed in a dorm room.

2013-12-31 08.50.122013-12-31 08.50.36

What we did:
Do note that there’s an entrance fee of $10 for some of the attractions in Mandalay  such as the Royal Palace, Kuthodaw Pagoda and Shwe Nandaw Kyaung Temple. But of course, if you don’t wish to pay, you may still visit these places, but can only view from the outside of the attraction. For us, we bought the pass.  

For the first day, we explored Mandalay on a bicycle and visited the Royal Palace and  Atumashi Monastery. We also visited our Burmese friend, Sophia whom we befriended from Couch Surfing. Had a great conversation with her and her dad over coffee at their  Dreamland  Art Studio.  Quite an adventure itself cycling on the busy roads with crazy traffic from almost every direction. Especially after the sun has set, it was really quite a challenge cycling in the dark with no bicycle lights at all. Thank god we made it back in one piece.

2013-12-30 09.17.04-1

Royal Palace

On our second day in Mandalay, we shared a taxi with 3 other backpackers who also stayed at Yoe Yoe Lay Guesthouse. Our host was very helpful in coordinating this for us and for arranging a taxi driver guide to bring us around. It was really cost economical as the total cost was only around $36 and we shared it among the 4 of us! Our guide brought us to several pagodas, temples and the ever famous Ubein Bridge.

FV7A1292

Sunset at Ubein Bridge

How much we spent in total:  
Food – $25

Activities – $20 (Mandalay Zone Admission Fees)
– $18 (shared taxi with other tourists to visit the attractions in Mandalay)
– $6 (bicycle rental)

Transport – $8 (taxi to Yoe Yoe Lay Guesthouse from Bus Station)

Accommodation – $40 (dorm room fees for 2 nights)

Others – $2 (laundry done at Yoe Yoe Lay Guesthouse)

Total expenditure for 2 pax    $119

Average expenditure/pax – $59.50

Day 5-9: Hsipaw

How we got here:
Took a day bus from Mandalay to Hsipaw. The bus left at around 9am and reached Hsipaw around 7pm. This time we took a normal bus (non-VIP) and shared the bus with tons of other locals. Every space in the bus was fully maximised to fit as many passengers as possible. Plastic chairs were placed in the middle in between the seats to accommodate more passengers!

FV7A1341

Where we stayed:
Another backpacker recommended us Mr Charles Guesthouse and we decided to heed his advice. Rooms were cheap and the ambience was great! Very friendly staff, comfortable clean rooms. Rooms were at $14 per night.

What we did (read about our Hsipaw trek experience here!):
After much feedback from other travellers, we decided to go for the 3d2n trek at Hsipaw. We initially wanted to do the much raved about trek from Kalaw to Inle lake, but we were told that the trek in Hsipaw was less touristy and more authentic. Boy were we glad that we did it. Definitely one of the highlights of our Myanmar travel! Our trekking guide was arranged from our guesthouse and we managed to find 6 other backpackers to join us for this trek. You need a minimum of 4 pax for this 3d2n trek.

FV7A1381

How much we spent in total:  
Food – $18

Activities – $80 (3d2n Trek)
– $10 (Tips for our awesome guide)

 Transport – $10 (Bus from Mandalay to Hsipaw)

Accommodation – $28 (for 2 nights)

Others – $3 (Medicine for food poisoning)

Total expenditure for 2 pax    $149

Average expenditure/pax  – $74.50

Day 10-12: Bagan

How we got here:
Took the train from Hsipaw to Pyin Oo Lwin (940am to 4pm) and crossed the famous Goteik Viaduct (highest railway in Myanmar). It was indeed quite a nerve wrecking ride. After alighting, we took a shared pick up to Mandalay Train Station where we took an overnight train to Bagan. I must say, the overnight train from Mandalay to Bagan (9pm to 4am) was a really interesting experience. Throughout the entire ride, you’ll be thrown about in all directions and you’re literally airborne most of the time. Thankfully, we still managed to catch some sleep despite the turbulent ride.

FV7A9990

On board the Goteik Viaduct – highest railway train in Myanmar

Where we stayed:
We stayed at Winner Guesthouse and it was not too bad. Cheap and clean, central location. Though Bagan is quite small and you can easily explore one end to the other end in a day on a bike.

What we did:
Bagan is an ancient city with more than 2,000 shrines, pagodas and stupas, one of the world’s most beautiful temple cities. Also, Daniel’s favourite.

1. Explored Bagan on an electric bike and scoured the city in search of the perfect place for viewing sunrise.

2. Hot Air Balloon (check out our experience here!) – booked our hot air balloon flight with Eastern Safaris, a highly reputable and recommended operator. Albeit being costly, safety always comes first and with them, we felt assured of our safety. This was definitely another highlight of our trip! Very awesome experience!

FV7A0257

How much we spent in total:
Food – $69.60

Activities – $640 (Hot air balloon)
– $29 (Electric bike rental for 2.5 days)
– $30 (Admission pass)

Transport –  $8 (Taxi to Winner Guesthouse)
– $20 (Overnight train from Mandalay to Bagan)
– $4 (Bus to Mandalay train station from  Pyin Oo Lwin)
– $12 (Train from Hsipaw to Pyin Oo Lwin)

Accommodation – $72.50 (3 nights)

Others – $5 (donation)
– $3 (Medicine and toothbrush)
– $2.6 (Laundry)

Total expenditure for 2 pax    $895.70

Average expenditure/pax  – $447.85

 Day 13-14: Inle Lake
Hmm frankly speaking, Inle Lake is one of our least favourite amongst all of the other places that we’ve been to in Myanmar. It’s a little too commercialised for our liking. But still, it’s really scenic and still worth going if you have the luxury of time. Otherwise, we would say that it’s okay to give it a miss too.

How we got here:
Took the overnight bus from Bagan (7pm-6am). Cost us around $11 each.

Where we stayed:
As we didn’t book our accommodation in advance, most of the guesthouses were already full 🙁 Our pickup driver recommended to us “Blissful Hotel” which cost us $25 per night. Not too bad actually, very new and clean. Only thing is that it’s quite far from the main market and river. Also, the ambience is not as cozy as compared to guesthouses.

What we did:
There’s nothing much to do in Inle lake besides taking the commercialised boat trip out to Inle Lake. We paid around $15 for a half day boat trip. During this boat trip, you’ll get to see the famous fisherman and their one leg paddling, Jumping Cat Monastery, Cheroot Factory, Lotus Weaving Factories, etc. On our second day, we visited the market and took a nice stroll around the village.

FV7A0828

How much we spent in total:
Food – $73.70

Activities – $15 (Boat Trip in Inle Lake)
– $20 (Entrance Fee to Inle Lake)

Transport – $2 (Taxi to Blissful Hotel)
– $10 (taxi from Airport to Yangon Regency Hotel)

Accommodation – $60 (2 night)

Others – $1 (Pack of Cheroots)
– $10 (1 hour Massage each)

Total expenditure for 2 pax  $191.70

Average expenditure/pax –  $95.85

 Day 13-14: Yangon

How we got here:
Took the overnight VIP bus from Inle Lake (7pm-6am). Cost us around $22 each. Once again, very awesome experience, comfortable, lots of leg room space, snacks and water provided. There’s even a toilet in the bus.

Where we stayed:
We randomly searched online for a recommended guesthouse and came across “Chan Myae Guesthouse”. Despite the long flight of stairs you’ll have to climb before reaching their reception, we would highly recommend this guesthouse! Very homely, serves one of the best breakfast, and best part of all, their wifi connection is the strongest we’ve had in Myanmar! All the rooms were taken up and we were only left with the dormitory which we didn’t mind. Just that it’s still under construction and there were workers living on the same level too.

What we did:
1. Watched a local movie in their local theatre. Very very awesome, highly recommended! The movie we chose happened to have english subtitles. Tickets were very cheap too! Cost us $1.50 per ticket. The theatre was surprisingly really modern and well equipped with dolby surround sound! (allll aroundddd youuuuu)

2014-01-11 13.31.06-1

2. Visited the Shwedagon Pagoda which is one of the largest and most beautiful pagoda in Myanmar.

FV7A9612

How much we spent in total:
Food – $31.10

Activities – $2 (Yangon Circle Line Train)
– $3 (Movie tickets)

Transport – $1.50 (Taxi to Shwedagon Pagoda)
– $0.80 (trishaw ride)
– $8 (Taxi from Shwedagon Pagoda back to Guesthouse)
– $6 (Taxi to airport)

Accommodation – $20 (1 night)

Total expenditure for 2 pax  $72.40

Average expenditure/pax –  $36.20

Total expenditure/pax for the entire 16 days travel$1,005.15  

2 Day 1 Night Trek + Home Stay in Laos

2 Day 1 Night Trek + Home Stay in Laos

This 2D1N Trek + Home stay in Laos was definitely another highlight of our Laos trip.

We randomly came across this small stall that advertised for home stay at the village in Laos. Feeling spontaneous, we  booked our trek + home stay package with them there and then.

We started off with a trek up to the village. It was a relatively easy trek. We left our bags at the agency and carried only a day pack.

IMG_8328IMG_8344

Lunching the local style. The locals there eat with their hands. And our food was served on banana leaves. Everything was biodegradable. Once we were done, our guide wrapped up everything and simply threw it into the bushes. Convenient, easy and eco-friendly!

IMG_8358IMG_8363

Along the way we stopped at a school in the village. The kids there were adorable. They were so easily contented and they find joy in the simplest things in life.

IMG_8585IMG_8579IMG_8577IMG_8570IMG_8567IMG_8566IMG_8557

Soon we reached the village. It was beautiful. This village felt very untouched, and surreal. We heard from the village chief that we were the first travellers there at their village who were doing the home stay. It was all mud ground and the wooden houses were built on stilts. There were sewage canals dug into the ground and you can literally see human waste floating down the canal.

IMG_8436

The only toilet in this entire village

IMG_8552IMG_8547IMG_8531IMG_8527IMG_8522IMG_8515IMG_8507

Our home for the night! We got to stay at the village chief’s house. This was how their living room looked like and also where we slept. We ate dinner with the village chief and his family and tried their home made wine which was very potent!

IMG_8490IMG_8489IMG_8485IMG_8456IMG_8448IMG_8441IMG_8439IMG_8432IMG_8421IMG_8408IMG_8402IMG_8393

It was really a great experiencing the “village life” in Laos. The people there were so innocent and genuine. For once we were totally off the grid with no wifi connection or television to distract us. It was just us and nature. It was magical.

Surfing in Bali like a Pro

Surfing in Bali like a Pro

IMG_5247

We’ve heard that Bali has the best waters for surfing and we knew we had to head there! We’ve both always wanted to try surfing but never really had the chance to. Not many places have waters that are suitable for surfing in Bali, for the beginners at least.

We decided to head to Kuta Beach Bali for a short getaway to surf. After doing much research, we settled on Odyssey Surf School  . They were priced slightly more expensive than the others, but they are a lot more established and reputable. In such sports, safety comes first.

We really didn’t know what to expect as it was our first time surfing. But the receptionist claimed that usually by the first lesson, we will be able to at least stand on the surf board already. We could also just pay for 1 lesson first and if we decided to extend for 2 or 3 lessons, we can do so after the first lesson. In the end, we did 3 days of surfing, approximately 3 hours per lesson.

About 30 minutes of our first lesson was spent “surfing” on the sand. They’ll teach you the 3 important steps to surfing.

But first, you’ll have to learn the proper posture and positioning of standing on the board.

7450_10151716150965560_1200036831_n

Start paddling when you see the wave approaching! Take in nice long strides, and increase the speed and intensity as the wave approaches.

8002_10151716152240560_266409365_n

Step 1. Prop yourself up on the board by straightening both arms.

993894_10151716152355560_1758350647_n

Step 2.  Place your right foot forward, putting yourself in a semi squatting position with your arms still holding onto the board

1004780_10151716151455560_735487127_n

Step 3.  Stand up on both feet, with your knees slightly bent, and your back straight. And try to BALANCE!

IMG_5146IMG_7054IMG_6098

Essential Information:

Odyssey Surf School
3 days lessons: US$95/pax
We chose the group package. But they had enough instructors and in the end, it’s 1 instructor to 2 of us although it was supposed to be in a group of 4.

We stayed at  Melasti  Beach Bungalows & Spa Hotel. We booked our accommodation online via Agoda.com and paid only US$140.58 for 3 nights for the 2 of us.    Decent place to stay at and relatively near to the beach, approximately 10 minutes walk.