Travelogue

8 Exciting Things To Do In Palawan in 5 Days

8 Exciting Things To Do In Palawan in 5 Days

Palawan has always been renowned for its stunning beauty and it is no surprise that it has been rated as the most beautiful island in the world by Conde Nast Traveller in 2016. So here’s our recommended list of things to do in Palawan in 5 days!

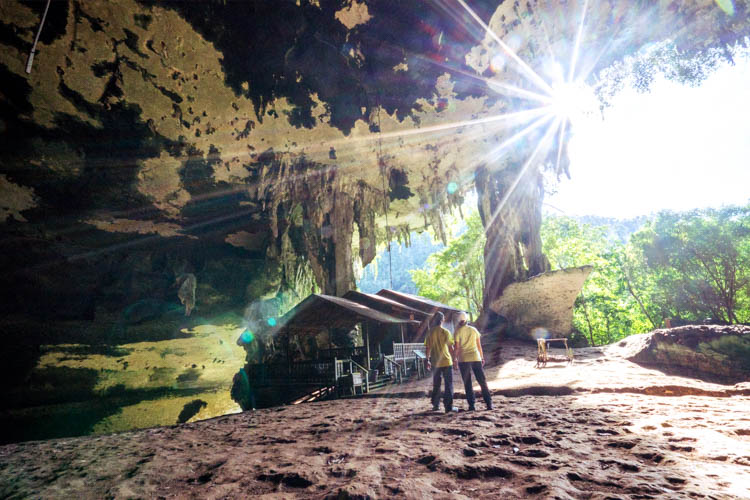
#1. Underground River in Puerto Princesa

This is definitely a must do if you’re travelling to Palawan. This attraction is also a World Heritage UNESCO site and it has one of the most impressive cave systems in the world. Its spectacular limestone karst formation is also highly commendable.

_DSC4918.jpg

Inside the remarkable Puerto-Princesa Subterranean River National Park!

As part of their conservation efforts, it was compulsory for us to pay for the audio device for the tour. It was to reduce the noise in the caves that would affect the bats and other creatures living inside the cave. Thumbs up to the team for its eco tourism efforts! Read our post on how you can DIY for the underground river tour!

G0022363.jpg

Went during the rainy season, turned out great nonetheless!

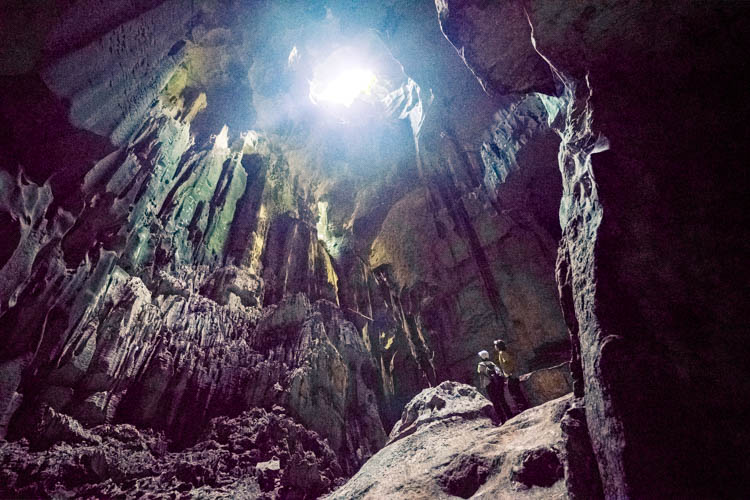
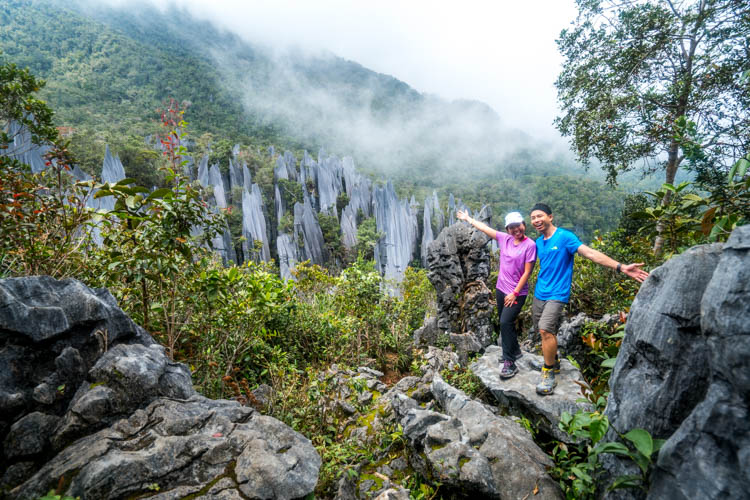
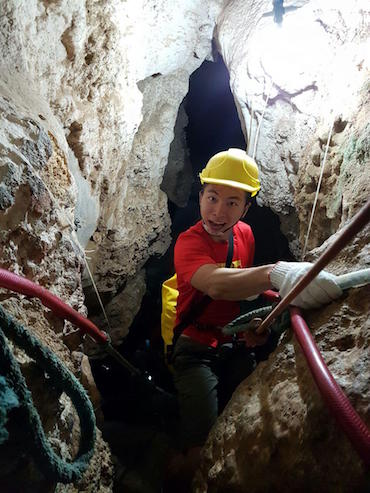
#2. Spelunking Adventure at Ugong Rock

If you’re already at Puerto Princesa for the Underground River tour, you can also make your trip even more worthwhile by going for a caving adventure at Ugong Rock! Don’t expect much though, the Ugong Rock adventure is kinda easy and can be completed within 1 hour. But still, it was quite fun! 🙂 Click here for our guide on how to get to Ugong Rock on your own!

photo_2016-10-19_16-21-10photo_2016-10-19_16-21-07

_DSC4973.jpg

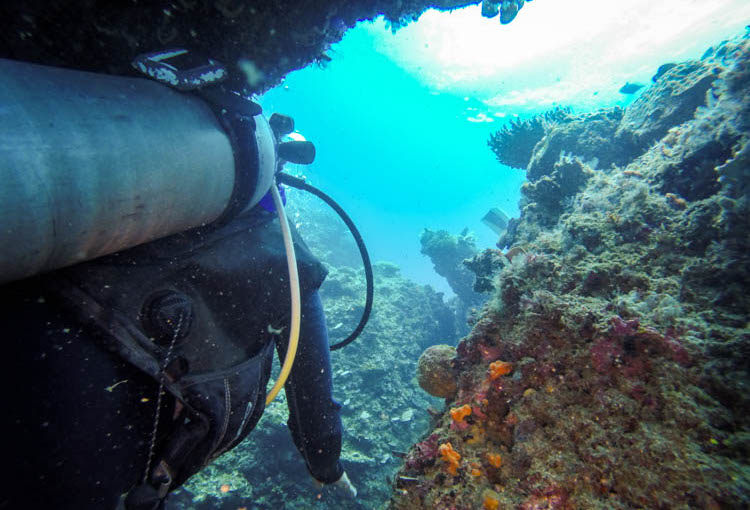
#3. Diving in El Nido

Diving in El Nido is great if you love macro marine life! We spotted nudi branches, lion fishes (plenty of them, be careful not to go too near!), trumpet fishes, barracudas, ghost fish, cuttlefish, trigger fish, sting rays, electric clam, eels, and many more! We dived with Deep Blue Dive Seafari (recommended!) and enjoyed 2 days of awesome diving with them! Check out our detailed post what it’s like to dive in El Nido during the  monsoon season!

G0142791.jpgG0214446.jpg

#4. Cliff Climbing at Taraw Cliff in El Nido

Sadly we didn’t get to experience this activity on our own though as the weather wasn’t on our side. We were there in El Nido during the rainy season and it was too dangerous to attempt this cliff climb. Apparently the local tour agency told us that you need 3 consecutive sunny days before you can go on this tour! Well, it rained every day when we were there….But still, you should give it a try if you’re there during the dry season! The view from the peak seems spectacular!

taraw-elnido

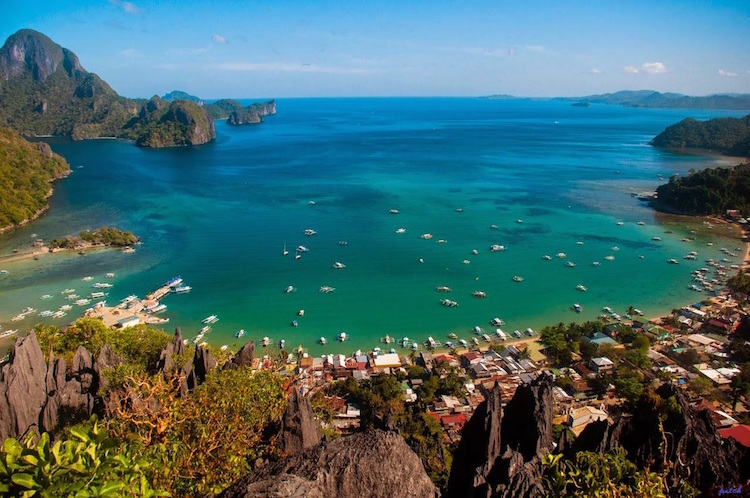
Photo credits: disislanz.files.wordpress.com

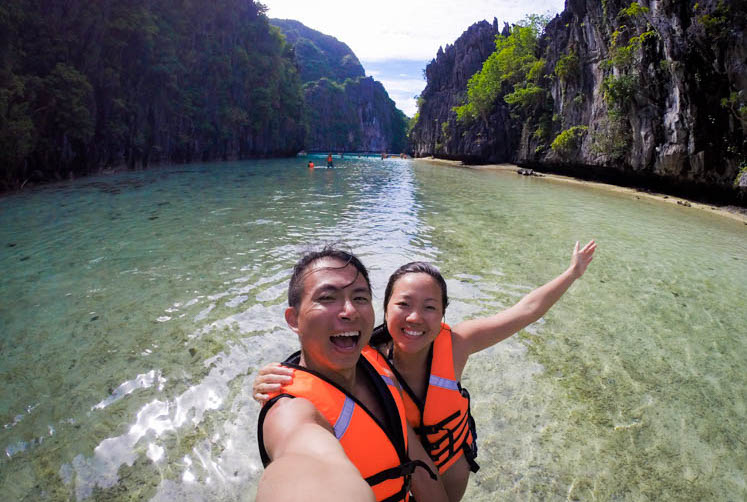
#5. Island Hopping at El Nido

There are 4 main tours (A,B,C,D) in El Nido that all agencies organise. Most popular would be Tour A where you get to see 3 different beaches as well as 2 lagoons. After going for the tour, we can understand why it was the most popular tour. The lagoons really lived up to their hype and they were so pretty!

_DSC5057.jpg

At the big lagoon of El Nido

Usually lunch will be provided and cooked on board the boat and it was really delicious! Also you will get to snorkel when the boat stops at the beach or lagoon. Snorkelling gear will usually be provided by the agency. There are plenty of agencies providing this tour, just go up to any and sign up for it. Cost is around 1,200PHP for Tour A.

G0253720.jpg

#6. Explore the Hidden Gem, Nacpan Beach

If you have a spare day, try to include Nacpan Beach in your itinerary! We found out about this hidden gem after talking to one of the locals and apparently the locals loved this beach! It’s about 45 minutes away from El Nido city by motorbike.

_DSC5107.jpg

Pristine quiet beach with almost no tourist!

How to get to Nacpan Beach: You can either take a trike or rent a motorbike. It’s north of the main El Nido city and it’s just a straight route till you see the sign that leads to Nacpan beach.

Tip: Avoid going on your own by motorbike during rainy season. The route leading to the beach is mud ground and when it’s wet, you can imagine the challenge of biking through it. Well, we lived to tell the tale though, so we still recommend it for those with a penchant for exciting adventures! 😀

#7. Hike up the Twin Peaks at Nacpan Beach

If you’ve decided to include Nacpan Beach in your to do list, don’t forget to hike up the twin peaks near Nacpan Beach. When facing the sea, the Twin Peaks will be on your far left. Just walk towards it and walk up the trail. The view from the top is breathtaking! The hike is a relatively short 15 minute hike albeit it being quite steep when nearing the top. We were just wearing slippers and it was pretty manageable actually.

_DSC5112.jpg

Hiking up the Twin Peaks at Nacpan Beach

_DSC5130.jpg

#8. Explore the island on a motorbike

If you have another spare day or afternoon, consider renting a motorbike to explore the other parts of the island! You can get to waterfalls, Nacpan Beach, or simply just enjoy the picturesque views along the way.

Cost of renting a motorbike: 300PHP for a whole day

G0014982.jpg

Exploring El Nido on a bike!

So that’s it! Hope you’ve enjoyed our post on things to do in Palawan! Do comment below if there’s anything that we’ve missed out and should be added to our list! 🙂

Our Experience on Diving in El Nido, Palawan During Monsoon Season

Our Experience on Diving in El Nido, Palawan During Monsoon Season

We’ve long heard about the highly raved about beautiful pristine beaches of Palawan, the crystal clear azure waters and finally we get to check it out for ourselves! Both of us absolutely love diving and couldn’t wait to dive at El Nido!

Ps. We went during the monsoon season but all turned out great! Read on to see our experience on what it’s like to dive during the rainy season!

_DSC5068.jpg

Can you see the impending storm approaching…

What to look out for when choosing a dive company

So first thing first, the challenge was selecting a reliable and trustworthy dive company to dive with! There were just too many to choose from and after reading tons of reviews from online blogs and forums, we’ve decided to go ahead with Deep Blue Dive Seafari (highly recommended by us!).

_DSC5067.jpg

When travelling, we’re willing to save on food/accommodation, but activities (especially when it involves safety) is something that we will never compromise on. 

Always do your homework and research online first for travellers’ reviews of that shop. Check that their equipment look reasonable and safe (not rusty or looking too old). Assess the dive master’s knowledge, talk to them and make sure they know what they’re talking about. Never make a decision based on lowest price offered (red flag alert if their prices are too cheap to be true!)

We dived with Deep Blue Dive Seafari and we’re both very satisfied and happy with them. Highly recommended if you’re looking for a safe and trustable company to dive with. You can read more reviews on them here by other travellers!

G0172844.jpg

Delicious lunch prepared by their in-house chef on board, best ever!!

We did a 6 dives package (2 days) with them and lunch was included too! Lunch was prepared by the chef on board and it was sooooo good! 😀

So, what to expect when diving in El Nido during “monsoon season”

_DSC5134.jpg

uh-oh……we’re in trouble….

Unfortunately, we went during the rainy season in October to El Nido and we weren’t quite sure what to expect. Since most people say that the best time to visit El Nido would be during summer (March-May). Well, there’s always a good out of every “bad” situation right?

True enough, it rained almost every day that we were there in El Nido. But thankfully, the rain usually either starts in the late afternoon onwards (after 3pm) or throughout the night. Usually in the morning, it’ll be clear and sunny, perfect for diving!

_DSC5064.jpg

Getting ready for our dive!

But best part of it all? There aren’t as many people/boats here as compared to during the summer months! Apparently our guide told us that during peak season, there are 5 times the number of tourists and boats! Can’t imagine!

_DSC5017.jpg

Relatively less people during off peak season in El Nido!

Visibility was not as great as compared to summer months, but still it was good enough! One thing we love about diving in El Nido is the wide variety of marine life! We spotted nudi branches, lion fishes (plenty of them, be careful not to go too near!), trumpet fishes, barracudas, ghost fish, cuttlefish, trigger fish, sting rays, electric clam, eels, and many more! Enjoy the photos taken below during our dives!

G0142791.jpgG0132737.jpgG0214446.jpgG0424949.jpgG0263023.jpgG0082605.jpg

When is the best time to dive in El Nido

It really depends on your priority. For us we had no choice as our schedule only allowed us to travel during this period (October) which happened to be the rainy season in Philippines. But thankfully all turned out great still! We would avoid summer (peak season) though, can’t imagine diving with 20 other boats around.

Dec-Feb: Whale Sharks, Sperm Whales, Manta Rays

Summer months (March to May): Dry season, excellent visibility

Where to stay in El Nido

_DSC4994.jpg

Recommended accommodation in El Nido – Relucio Travellers Pension

Relucio Travellers Pension 
This little hideout is truly a hidden gem in El Nido. Free drinking water, coffee, hot shower available, aircon/fan option, great location and best part of it all, amazing balcony that overlooks the sea! Room rates start at 500php for a fan room without shower. The owner, Marie, was really nice and warm too!

Click here to check latest pricing and to book for accommodation in Palawan!

_DSC4995.jpg

“Private” balcony outside our room!

Another benefit of travelling during off peak season in El Nido, cheaper and more available accommodation options! We practically had the whole balcony to ourselves since there wasn’t anybody else staying here! You can also try asking for discounts during off peak season.

Tip: Remember to book your accommodation in advance when travelling to El Nido even during off peak! We didn’t and most hostels were fully booked and we had to walk around for quite some time with our big backpacks before finding the hidden gem as described above!

Where to eat in El Nido

photo_2016-10-19_11-43-53

Best authentic and cheap Filippino cuisine in El Nido!

We found another little hidden gem that offers cheap and delicious local cuisine! It’s called Maa Grill and Restaurant and they have a special lunch menu of their local fare for only 80PHP for a meal. Pretty decent we say!

How to get to El Nido 

From Sabang

Lexus van, 700PHP, 5.5 hours. You can book the tickets directly at the Lexus booth at the bus terminal. Van leaves Sabang at 7.30am, 8.30am, 1pm, 2pm, 4.30pm.

From Manila

Direct flight (1 hour) – Airswift

Manila to El Nido: 8:00, 12:00, 16:00, 17:35 daily
El Nido to Manila: 6:30, 9:55, 11:00, 14:00

Estimated cost: 5,000-7,000PHP one way

Cheaper alternative: Take a budget flight from Manila to Puerto Princesa via Air Asia or Cebu Pacific (est. cost around 2,000PHP) followed by a van transfer (500PHP) from Puerto Princesa to El Nido.

From Puerto Princesa

Van transfer directly from Airport or terminal – 600 to 700 PHP, around 6 hours

Hope the above post is useful to you! Do drop a comment below if there are other useful tips about travelling in El Nido that we missed out!

5 Ways To Train For Everest Base Camp

5 Ways To Train For Everest Base Camp

Daniel and I will be attempting to climb to Everest Base Camp (EBC) with Mosaic Adventure in October this year and we’re really looking forward to it!

Climbing EBC is kinda no joke though, it has an altitude of 17,598 ft (5,364 metres) and most people say that the challenging part of it ain’t the trek itself but the high altitude! Also because the trek is spread over 20 days, that means that a huge amount of stamina is required as there will be at least 6-8 hours of non stop trek per day! The good thing though is that no technical experience is required to climb to EBC. So here are 5 ways that you can train for Everest Base Camp.

FV7A4748

1. Weekly treks at MacRitchie Reservoir or Bukit Timah Hill

_8220075.jpg

Usually we hike an average of 10km-15km averaging around 2 hours per session. It’s best to trek with a loaded pack to train up your stamina too. Sadly in Singapore the highest altitude that you can train at is only 164m which is at Bukit Timah Hill.

Ps. Read till the end of the post to find out where you can  train at an altitude of up to 4,500m in Singapore!

2. Climb stairs to train your thigh/calf muscles

G0332594.jpg_DSC4694.jpg

One thing about Singapore is that we have a lot of high rise buildings (aka HDB flats), some with even up to 30 storeys. Daniel and me will climb up the stairs with a loaded pack (7kg for Gina and 14kg for Daniel) and usually we’ll do about 3-4 reps each time.

Tip: If you have weaker knees, take the lift down instead!

3. General fitness activities to improve your stamina

photo_2016-09-14_09-32-19photo_2016-09-21_08-27-38

Both Daniel and I are very into rock climbing lately and that has become part of our weekly exercise regime! We normally climb at Onsight or Climb Central and each session usually lasts for about 3-4 hours. You can basically do anything that you love as long as you’re active and it gets your heart pumping! It can range from dance classes, swimming, muay thai boxing to zumba! Anything that excites you and makes you happy! 🙂

4. Weekly gym sessions to increase our strength endurance

_DSC2095.jpg

To improve our strength endurance, we train a lot using the TRX at Altitude Gym where we focus on working our different muscle groups which are usually our arms, legs, back and core. Trust me, just try one session of TRX and you won’t be able to feel your arms and legs for the next 3 days! We do a lot of squats and other exercises that specifically target our quads and glutes which will be vital in helping us ascend to Everest Base Camp!

5. Hiking on an inclined/steps treadmill

_DSC3918.jpg

On days that you’re feeling too lazy to head all the way to Bukit Timah Hill or MacRitchie, you can workout out at a nearby gym instead! We usually walk for about 30-45 minutes on the treadmill with an inclination of around 10 and speed about 3.5-4. Sounds easy, but trust me, you will find yourself breathless after the 30 minutes! Alternatively, we like training using the steps treadmill where you really work out your thigh muscles!

To train up both our cardiovascular endurance and strength endurance, we’ve been training at Altitude, Singapore’s first simulated altitude training facility where we get to train at a higher altitude (up to 4,500m) even when we’re on low grounds! That’s 25 times higher than the highest point in Singapore which is Bukit Timah Hill!

_DSC2108.jpg

We’re at 3,996m in Singapore!

How it works
Altitude Gym makes use of this special technology where it reduces the oxygen level in the gym to around 13-14% as compared to the normal oxygen level of 16%. This lower level of oxygen simulates how you will feel at a much higher altitude where the oxygen is a lot lower.

So it’s pretty much like a regular gym with guided classes, only difference is that you’re training with a much lower oxygen level which will train your heart to pump faster and harder. They also have a wide variety of guided classes ranging from TRX, yoga to circuit training for you to choose from!

_DSC2063.jpg_DSC3968.jpg

So we’re still 1 month away from our trek and we’ll be training as much as we can to mentally and physically prepare us for the trek! Looking forward to EBC already! 🙂 Do share with us some tips by commenting below on how to train better if you’ve climbed EBC before too!

Top 8 Things To Do in Ciletuh Geopark – West Java of Indonesia

Top 8 Things To Do in Ciletuh Geopark – West Java of Indonesia

Recently Daniel and I were invited to explore Ciletuh Geopark located in West Java of Indonesia. Neither of us have heard about this place before and we were really excited to visit it! Here’s our recommendation on things to do in Ciletuh Geopark!

1. Take a sci-fi shot at Kawah Putih

G0272541.jpg

Felt like we were on another planet at Kawah Putih!

Kawa Putih translates literally as “white crater” and when you see it you will understand why. Its water is naturally whitish blue which makes it so appealing and picturesque! Plus the morning fog, everything looks so mysterious and sci-fi which makes us look like we were on a totally different planet.

_DSC4030.jpg

Tip: If you’re planning on heading to Kawah Putih in the morning, remember to bring along a jacket and preferably wear long pants to fend off the cold! It gets reallllyyy cold in the morning, think it was at least around 10-15 degrees?

2. Walini Tea Plantation

G0292562.jpg

Fresh local tea anyone?

This place makes an awesome photo stop with the rolling hills of green in the background. Indonesia is well known for their local tea and over here, you can actually purchase their local tea leaves for $2 per box! They come in many interesting flavours such as apple, blackcurrant, ginger, lemon and many more!

3. Witness cute turtle hatchlings at Pangumbahan

_DSC4075.jpg

Giant turtle in the midst of laying eggs!

Pangumbahan Turtle Park is one of the largest turtle conservation and breeding parks in Indonesia. We visited the park around 10pm just in time to witness a humongous turtle laying eggs!

_DSC4067.jpg

Look at those cute turtle eggs!

Unfortunately there was a delay and we couldn’t make it in time to see the hatchlings being released into the sea which was supposed to be around 5.30pm.

4. Hop on a boat to explore the different rock formations of Ciletuh

_DSC4133.jpg

You will get to see a lot of these fishing boats (“bagans”) stationed out there in the deep sea. We saw so many interesting rock formations, some with really interesting names given by the locals.

_DSC4100.jpg

Fishing bagan in Ciletuh Geopark

Do keep a lookout for playful dolphins! We were lucky to see a whole group of dolphins (at least 20 of them) swimming behind our boat! Unfortunately we weren’t fast enough to capture a close and good shot of them.

Tip: Bring along sunscreen! Some of the boats do not have shelter and you will definitely be toasted under the sun!

5. Take a dip in the majestic Sudong Waterfall

_DSC4158.jpg

At the beautiful Sudong Waterfall

Ciletuh Geopark has a total of 9 waterfalls, one of them is the Sudong Waterfall. You can even swim in it if you’d like!

6. Experience an out of this world performance by the local village tribe

_DSC4275.jpg

This is definitely one of the main highlights of our trip! It was so crazy!! Words can’t describe how we felt throughout the performance, you have to witness it for yourself to believe what we’ve said!

_DSC4174.jpg

Basically this performance deals with black magic. It’s no secret that Indonesia still uses black magic/voodoo and it was such an interesting experience actually witnessing it for ourselves. The whole idea is that the dancers were really possessed by spirits and there were bomohs (witch doctors) around to manage them.

7. Enjoy the sublime sunset view at the hilltop of Punchak Darma

G0312578.jpg

On top of the world with love at Punchak Darma! <3

To get to the summit is not that easy actually, it’s quite far and will take at least 2-3 hours if you’re planning to hike up on your own! But for us, our organiser was so kind to arrange motorcyclists to pillion us up!

_DSC4425.jpg

calm before the storm.

This ride itself is an activity on its own. The terrain was ultra bumpy and some parts were steep too! To make matters worse, it rained just before we went up, hence the ground was still so muddy! Imagine riding up/down the slopes on a motorcycle, it was absolutely nerve wrecking!

Tip: Don’t forget to check out the Cimarinjiung Waterfall which is near the bottom of the hill.

G0322589.jpg

At the majestic Cimarinjiung Waterfall!

8. Soak your aching body in a natural hot spring

_DSC4488.jpg

Fancy a dip in a local hot spring?

This geyser here in Ciletuh is as natural as it can get. Don’t expect anything fancy at all, it’s kept in its natural state and is mostly utilised by the locals. We were both sun burnt and didn’t dare to soak our bodies in the ultra hot water as it will only worsen our burnt skin condition! But we were standing close enough to feel that the water was really hot! The locals also believe that this natural hot spring water will be able to cure your body from its aches and ailments.

Tip: If you’re game enough, go for their “spa” where you will get a special massage using strong water pressure and it lasts for as long as you’d like! Best part, it costs only $5!

Why You Can’t Leave Sarawak Without Visiting Miri

Why You Can’t Leave Sarawak Without Visiting Miri

Not many people have heard about or even travelled to Miri before. When you think of Sarawak, you will probably only relate it to Kuching. It’s our first time hearing about Miri too and we’re glad that we get to experience this amazing city!

Spot The Bird Nest Hunters At Niah Caves

Niah Caves go way back in history where 40,000 year old human remains were discovered! The tradition of the bird nest hunting also started a long time ago where the locals risk their lives to retrieve those swiftlets’ nests tucked high up in the cave ceiling!

If you look closely at the photo below, you’ll notice these thin long poles hanging down from the cave ceilings. Yes, this is the way up to the cave ceiling where the bird nest collectors get their raw bird nests. They have no safety harness or any other safety equipment when climbing up these wooden poles! Crazy right? These local people have been doing these over many generations and it’s very interesting that each pole belongs to 1 family. Somewhat similar to a plot of farm land that has been distributed to different families.

_DSC1515-HDR.jpg

At the entrance of Niah Cave

Apparently they used this really strong and heavy hard wood (ironwood) to build the pole ladders. These wood typically last for more than 100 years without rotting or breaking! And they’re really really heavy! I tried lifting one of it and it felt almost impossible. It’s just very hard to imagine how they can build these pole ladders which reach all the way up to the ceiling!

_DSC1607.jpg

Ceiling of Niah Cave where the locals collect the raw bird nests

Tip: Start your trip to Niah Cave early! There’s so much to explore within the cave and you will need at least more than 3 hours. Sadly we didn’t have enough time to visit the Painted Caves 🙁

_DSC1540-HDR-2.jpg_DSC1580-HDR.jpg

Challenge Your Senses At Lambir National Park

Usually people visit Lambir National Park during the day but for us, we did something special and did a nocturnal walk instead! According to our guide, the park comes alive at night and the experience is just different from during the day. Boy was it true!

_DSC1356.jpg

Night trek at Lambir National Park

Somehow your senses awaken the moment you step into the darkness of this forest. Your ears prick at the slightest and your eyes become more alert and notice every small movement made. Perhaps with full light during the day, our senses tend to take things for granted and fall into “sleep mode”. But they definitely can’t be asleep when it’s all darkness surrounding you.

Tip: This park is awesome for macro photography. Bring along a strong flash light if you wish to take photo of these cute little creatures! Request for Miki (park ranger), he’s very familiar with the park and can help you to spot these tiny creatures.

_DSC1376.jpg

Cute tiny leaf frog spotted!

_DSC1392.jpg

Colourful micro stick insect

_DSC1410.jpg

Cute froggy hiding among the leaves!

Essential Information

How to get there

For Niah Cave, it’s only takes less than hour to drive from Miri city. For Lambir National Park, it’s also around 40 minutes drive from Miri City. Both places are pretty accessible by car but not by public transport.

Where we stayed in Miri

Kingwood Boutique Hotel (Click here to check for latest hotel prices and book directly)

Awesome location, you have plenty of food choices just right outside of your hotel. There is a shopping mall with a supermarket just 5 minutes walk away as well. The rooms were small but very cozy. Super comfortable beds! Overall we really enjoyed staying in this hotel!

_DSC1341.jpg

How to book the above tours

We booked our tour with Amazing Borneo and they arranged for our accommodation, guide and transport in Miri! Great service, highly recommend them to anyone looking for a reliable and trustworthy agency in Sarawak.

Our Experience on Hiking The Pinnacles in Mulu

Our Experience on Hiking The Pinnacles in Mulu

Hiking the Pinnacles was honestly one of the most challenging but yet fun climb that we’ve ever experienced before! Most people also say that this hike is tougher than Mt Kinabalu! Read on to find out why!

The trek started off with a “relaxing” boat ride, thankfully our boatmen were strong enough to pull us across the shallow waters! But we heard that during low tide season, it’s worse than this! And you will have to be prepared to get out of your boat and help pull the boat. We could practically hear the bottom of the boat scraping the rocks!

_DSC1111.jpg

Our strong boatmen pulling us across the shallow waters!

After the 30 minutes boat ride, we reached the start point of the trek. Apparently there are no other routes to this start point besides taking the boat. From here, it’s a 9km jungle trek to Camp 5.

_DSC1120.jpg

Start of the jungle trek to Camp 5!

The trek was fun as it’s not just a boring, straight and flat road but instead, there are shaky nerve wrecking bridge crossings, undulating surfaces due to protruding overgrown tree roots or rocks and vertical rock faces that we had to climb using all 4 limbs.

_DSC1128.jpg

It took us around 3 hours to get to Camp 5. When we arrived, the first thing that we did was to jump into the freezing cold river! That was one of the best feeling ever, definitely a must after a tiring, hot and sweaty trek!

Tip: Swim at the far end nearer to the bridge, the water there is deeper and cleaner. We were too lazy to walk there though and simply just swam where it was closest to our room.

G0232504.jpg

Best ever, jumping into an icy cold river right after an arduous trek!

If you’re planning on trekking the pinnacles without a guide, do note that you will have to pack your own food. There’s a kitchen available for you to cook your own food. Alternatively, you can also order food from the staff to cook for you. You can also refill your bottles with drinkable for free at Camp 5.

Tip: Bring your own snacks to camp 5, they have a small store there but their selection is extremely limited and of course much more expensive.

_DSC1155.jpg

Spacious kitchen at Camp 5

For us we were on a tour with Amazing Borneo and our guide prepared our food 🙂 Feeling so pampered and loved!

_DSC1163.jpg

Sumptuous meal provided by our guide!

As for sleeping facilities, the rooms were very basic and bare. Basically the only thing provided was a thin mat, which was sufficient actually. If you’d like you can bring your own sleeping bag, but that would also mean extra weight while trekking. You can choose to rent a mosquito net too but we can’t be bothered to. The sandflies there were nasty though!

Tip: A must bring – insect repellent! Poor Daniel had sandfly bites all over his arms and legs!

We forgot to take photos of the shower facilities, but we were very impressed by the cleanliness and the infrastructure of the toilets at Camp 5! Way better than a lot of the other jungle trek camps that we’ve been to!

_DSC1165.jpg

Our cozy and humble abode for the night

If you’re not too tired at night, do check out the stars at Camp 5! There was hardly any light pollution and the milky way was really obvious that night we were there!

_DSC1173.jpg

Dramatic gorgeous starry night <3

And the next morning, try to catch the sunrise if you can!

_DSC1180.jpg

Witnessing the first light of dawn over the still waters.

We woke up at about 5.30am to get ready for our pinnacles trek the next day. While others were simply having tea and biscuits for breakfast, we were having freshly handmade roti prata that will fuel us for the upcoming challenging trek!

_DSC1192.jpg

Homemade roti prata for breakfast! Yummy!

From Camp 5 to the viewing point of the Pinnacles, the trail is about 2.4km in length and around 1,200m ascend in altitude. It’s a one day trek where you will head up in the morning, view the Pinnacles and then head back down to Camp5 before it gets dark.

The first hour will be to the mini pinnacles and if you can’t reach in 1 hour, your guide will likely ask you to go back down. I was pretty stressed out by this at first as I’ve heard from the other trekkers that it’s really not that easy. Thank god we made it in less than 45 minutes!

_DSC1206.jpg

Resting at the first stop – “mini pinnacles”

Of course being a jungle trek, there was so much of nature and wildlife to appreciate! Personally I hate creepy crawlies, but these little cuties were so pretty that they don’t disgust me as much anymore!

_DSC1329.jpg

Second tiniest frog in the world!

_DSC1295.jpg

What a pretty millipede! The ones in Singapore are all brown and slimy!

The second half of the journey was even more challenging with a lot of vertical rock faces that we had to climb using ropes, ladders and our 4 limbs.

_DSC1221.jpg_DSC1197.jpg

You have to be really careful when hiking up as there are a lot of booby traps and you could easily sprain your ankle! Furthermore with such a steep ascend in one day, it’s no surprise that you already feel like your legs no longer belong to you.

Tip: Wear a pair of light trek shoes with good grip! TNF trek shoes never fail to disappoint us. The grip is excellent and perfect for rough terrains like this! We were both wearing the TNF Ultra Hike II Mid GTX. High cut shoes are always better as they provide better support for your ankle. Also they’re waterproof! Can’t imagine how slippery this trek would be if it rains!

_DSC1228.jpg

_DSC1287.jpg

A total of 16 ladders before reaching the view point!

After 3 hours of hardcore steep ascend and 16 vertical ladders, we’re finally here at the top to get the best view of the Pinnacles! No regrets! According to our guide, apparently only 30% of the people get to make it to this point!

Tip: Wear light weight clothes when climbing the Pinnacles and preferably long pants to avoid getting your legs scraped by the razor sharp rocks! We really love the TNF Trekker II Pant-AP long pants as it’s very stretchy and it dries really quickly! Despite us sweating like crazy while climbing, our legs don’t feel stuffy at all.

_DSC1263.jpg

Us at the Pinnacles! Woohoo! We made it! 😀

_DSC1280.jpg

Most bizarre landscape ever with these razor sharp limestone spikes!

We had about 30-45 minutes to enjoy the Pinnacles view and to have our lunch at the same time before making our way back down to camp 5. Heading down was actually tougher than going up! Our knees and thighs were really screaming in pain after we were done with this trek.

_DSC1339.jpg

Waiting for the boat to bring us back to the park headquarters.

_DSC1334.jpg

Made a new friend with this little cutie while waiting for the boat!

Essential Information

Where we stayed at Mulu

Our first night was at Mulu Marriot Resort which was nicely tucked deep inside the greens! The night we were there, the sound made by the cicadas was deafening! It was sooooo loud! Apparently it’s the mating season now for the cicadas. Thankfully you can’t really hear them when you’re in the room. For the rest of the nights during the pinnacle trek, we were staying at Camp 5.

Tip: Dinner isn’t provided as part of the room package though. If you’re hungry and on a budget, you can check out the cheaper cafe located right opposite the river of Marriot Resort.

_DSC0726.jpg

Our pretty room at the Mulu Marriort Resort

_DSC0718.jpg

Ahhh, super beautiful room! Sad that we only get to stay one night here!

_DSC0722.jpg

View of the forest while you take a shower!

How did we get here

We took the MAS flight from Miri to get to Mulu. It was a really short 30 minutes flight.

How to book the above tour

The above Pinnacles trek is actually part of a 4D3N tour with Amazing Borneo at Mulu. The first day was to see the Show Caves (namely the Deer Cave and the Lang Cave) and the second day was to see Clear Water Cave and Wind Cave before heading for the pinnacles trek. This tour included a one night stay at Marriot too! If it’s possible, try to arrange Marriot on the last night instead of the first night so that at least you can have a well deserving night stay after your arduous pinnacles trek.

6 Stunning Caves In Sarawak that you never knew could exist

6 Stunning Caves In Sarawak that you never knew could exist

Being huge fans of caves, we were thrilled to be able to visit so many of them in Sarawak. Each cave has its own unique characteristic and flavour, such that we guarantee you won’t be bored even after visiting your 5th cave! Here’s a list of our favourite caves in Sarawak!

1. The Magical Fairy Cave

When we first stepped into the Fairy Cave, we were in awe of the greens inside the cave!  The cave was humongous! There were quite a number of steps to be climbed before reaching the cave entrance, but it’s really worth it.

Fun fact: The cave was named after this fairy statue that was built inside the cave where the locals actually come to pray to it.

_DSC0011.jpg

Feels like a scene out of a fairy tale!

_DSC0065.jpg

The inner part of the Fairy Cave

2. Deer Cave – Home of a Million Bats

Deer Cave located at Mulu in Sarawak, is the largest cave passage in the world and also the home to millions of bats. If you notice in the photo, that black patch on the cave ceiling, those are actually bats that are resting!

_DSC0871-HDR.jpg

Largest passage way cave in the world!

Fun Fact: Every day between 5-7pm if the weather is fine, 2-3 million bats will fly out of the Deer Cave in search for food! They will usually fly in a spiral manner like in the photo below as an attempt to distract and confuse their predator, the hawks! We were lucky to have witnessed this interesting phenomenon at about 6.30pm just before it turned dark.

_DSC0929.jpg

Witnessing the bat exodus outside the Deer Cave in Mulu!

3. Lang Cave – The Surreal Jellyfish Empire

The Lang Cave is smaller in comparison with the Deer Cave, but the beauty lies in the natural formation of its stalagmites and stalactites. There was a section that really resembled tons of jellyfishes!

_DSC0779.jpg

4. Clear Water Cave – Literally, Clear Water

This cave was special because there is actually a river flowing through the cave! Also, the water was really really clear! It felt so inviting to head down for a swim! Apparently you can do adventure caving in this cave, something that we were really keen in but unfortunately we did not have the luxury of time. We will definitely be back to try the adventure caving here one day!

_DSC1064.jpg

Beautiful cave with a super clear river flowing within the cave

_DSC1089-HDR.jpg

Clear Water Cave

5. Wind Cave (In Mulu) – Of Beautiful Cavern Architecture

It’s amazing how beautiful natural architecture is, just look at the beautiful rock formations inside of the Wind Cave in Mulu. A lot of the stalactites and stalagmites have reached each other and eventually formed a long pole structure.

Fun fact: A stalactite/stalagmite takes more than a 1,000 years just to grow 10cm. Can you imagine how old the cave is for such massive structures to be formed?!

_DSC1016.jpg

Stunning natural rock formation in Wind Cave (Mulu)

6. Niah Cave – Birdnest Hunters

We were surprised to hear that till date, the locals in Niah are still practising the traditional methods of extracting the bird nests from the cave ceilings! Particularly in Niah Cave, you will see a lot of long wooden planks hanging from the ceiling. These thin wooden planks were meant for the locals to climb up to the ceiling (without any harness or safety equipment), and to retrieve those swiftlets’ nests!

Fun Fact: Each wooden pole belongs to 1 family and you can akin this to a plot of farm land where different sections have been distributed to different families and that section of the cave is basically their livelihood.

_DSC1515-HDR.jpg

Watch the bird nest hunter in action at Gorgeous Niah Cave

_DSC1540-HDR-2.jpg

How to get to the caves:

There is no public transport to the caves above and you will have to charter your own private transport. We booked our tours with Amazing Borneo and generally it was a fuss free experience! We highly recommend them if you’re looking for a reputable and trustworthy agency in Sarawak.

10 Delicacies Worth Flying To Sarawak For

10 Delicacies Worth Flying To Sarawak For

If you’re a foodie, you will definitely enjoy feasting in Sarawak! Cheap and delicious! Here are 10 must try local dishes if you’re ever visiting Sarawak!

1. Oyster Pancake

Similar to the fried oyster egg in Singapore, but theirs is a crispy pancake instead of the starchy egg. Not too bad, worth a try, an interesting twist to the oyster egg.

_DSC9873.jpg

Oyster egg? No, it’s oyster pancake!

2. Teh C Peng Special (3 Layered Tea)

This is the bomb! Super nice! Somewhat similar to our teh peng in Singapore, except that they use palm sugar instead of condensed milk. It’s so nice that we bought back a whole bottle of the palm sugar to make our own teh c peng special.

_DSC0147.jpg

A MUST TRY!

3. Sarawak Laksa

This is one of Sarawak’s most popular local dishes. We personally didn’t really like it that much, taste abit like mee siam? There’s no coconut milk in the Sarawak laksa unlike the laksa in Singapore. But still, you have to try it to understand why it’s so popular!

_DSC0149.jpg

Sarawak laksa! Sadly no hum though 🙁

4. Mani Chai with Eggs

My favourite vegetable dish in Sarawak, super yummy! Seems like it’s a local favourite too? Every time we dine with a local, they will definitely order this dish for us.

_DSC0170.jpg

Fried mani chai with eggs! Yums!

5. Kek Lapis

Look at that rainbow assortment of colours! If you’ve a sweet tooth, then you definitely must try this. They are so creative and they actually came up with more than 30 different flavours! These kek lapis are usually home baked and they have interesting flavours such as bandung, horlicks, durian, strawberry cheesecake and a lot more. Normally they will offer you this sampling tray where you can try every single flavour before buying!

Tip: Ask your driver to take you to the local home bakery across the waterfront in Kuching, they bake the best kek lapis according to our guide!

_DSC0179.jpg

Too pretty to resist!

6. Street Market Snacks

If you visit a local market in Kuching, you will definitely find these vendors selling all sorts of fried snacks and kuehs. They’re absolutely delicious and also cheap! Usually it’ll cost you only 1 RM for 3 pieces!

_DSC0452.jpg

I really love the sweet kuehs! My favourite!

7. Chicken In Bamboo

Another local delicacy where they will put the chicken meat inside the bamboo and cook it over the fire. The chicken meat ends up really soft and tender with the meat sliding off the bones easily. They usually cook it with their local wild ginger which taste different from the ginger here in Singapore also.

_DSC0644.jpg

Chicken in Bamboo!

8. Kolo Mee

This is definitely a must try! The noodles taste really springy and tasty! Actually it tastes similar to wonton mee in Singapore, but the noodles is slightly different. Also according to a local, the more “wrinkly” the noodles, the better it is!

Tip: the best kolo mee can be found in the open air market in Kuching!

_DSC0705.jpg

Our favourite – kolo mee!

9. Sago Worms

YUMMMMYYYYYY! haha, hey the worms are not cheap you know. 1 basket of sago worms can get you 3 bowls of kolo mee! So well, Daniel’s usually the more daring one especially when experimenting with exotic food like this. And yes, he ate a huge juicy squirming worm alive!! EEEWWW! He said that it tasted like grapes except without the sweetness. I know, what a comparison right, I’ll never be able to look at grapes in the same way ever again.

_DSC1471.jpg

Anybody hungry or craving for these juicy babies?!

10. Ais Krim Bergula Apong

Apparently this ice cream is really famous in Kuching! The queue was always so long regardless of the time that we were there! They serve home made ice cream (texture felt like yoghurt) and drizzle gula apong syrup all over it. You can also choose a topping (cornflakes, cookies or peanuts) to go with it.

Tip: The shop at the open air market should be not bad, the queue is always super long even at 10pm on a random weekday night!

_DSC0710.jpg

Ais Krim Gula Apong!

Did we miss out any? Do share with us in the comments below if your favourite Sarawak food is not listed above! 🙂

7 Reasons Why You’ll Definitely Fall In Love With Kuching

7 Reasons Why You’ll Definitely Fall In Love With Kuching

Kuching, a natural tropical playground on its doorstep. For all nature and wildlife lovers, it will be a challenge to not fall in love with this amazing city.

1. You get to experience nature at its best in Bako National Park

_DSC9891.jpg

At the entrance of Bako National Park! Can you guess what the tourists were looking at?

Being one of the oldest national park in Sarawak, this place is full of wildlife wonders and a great place for avid trekkers. This park is also home to more than 250 rare species of the proboscis monkeys which can only be found in Borneo.

There are 18 routes in total ranging from a 30mins walk to an 8 hour trek. Due to time constraint, we did the Telok Paku trail which was only around 1 hour (one way) to the end. The terrain was quite challenging as you will have to cross over protruding overgrown roots and to clamber over undulating rocks and tree branches.

_DSC9929.jpg_DSC9932.jpg

For the geology lovers, you will appreciate the sea stack that has been formed over years of erosion. Known as the “Serpent Rock“, you can get a close up view of it via a boat ride from the beach at the end of the Telok Paku Trail.

_DSC9940.jpg

Famous “Serpent Rock” at Bako National Park!

It takes about an hour drive from Kuching City to Bako National Park. There is also accommodation available at the park if you’re keen on staying overnight. 

2. You get a chance to spot the Rafflesia Flower at Gunang Gading National Park

The Rafflesia flower is one of the rarest flowers in the world and it can be sighted at Gunung Gading National Park! A fully bloomed Rafflesia can grow up to 1 metre in diametre which is huge! Unfortunately it’s really difficult to see them as they take up to 9 months to blossom from a bud to a fully bloomed flower and have a life span of only 6-7 days!

We only managed to see a 3 month old bud when we were there. The bud is extremely delicate as it’s food to a lot of animals and most don’t survive till a full bloom 🙁 Also, apparently a fully bloomed Rafflesia gives off a smelly rotten meat smell, but we haven’t had the chance to smell that yet.

_DSC0689.jpg

Can you spot the big black bud of the Rafflesia?

Credits: http://images.guidetrip.com/

A fully bloomed Rafflesia. Photo credits: http://images.guidetrip.com/

But other than the Rafflesia, it’s still a great place for trekking and to enjoy moments of solitude surrounded by nature. There were longer treks available which lead up to the waterfall.

The Gunang Gading National Park is about an hour drive from Kuching City and it’s near the Fairy Cave & Wind Cave. We would recommend to combine both activities in the same day. 

3. You can get up-close with orangutans at Semenggoh Wildlife Centre

This has gotta be one of our highlights of the trip! We really enjoyed watching the orangutans in action up close while being in a habitat as real as possible. The Semenggoh Wildlife Centre is a rehabilitation centre for the orphaned or injured orangutans and once they are well enough, they will be released back into the wild.

_DSC0405.jpg

The trip began with a short trek into the forest where the feeding platform is. The ranger will then start taking bunches of bananas, coconuts while making a tarzan call at the same time to attract the orangutans. Not too longer after, we saw Ritchie (second largest male orangutan in Semenggoh) climbing the rope and greedily making its way towards to feeding platform.

_DSC0435.jpg

A mother orangutan and her baby soon began making their way to the fruits too.

Fun fact: Every orangutan builds 2-3 new nests everyday which are usually high up in the canopy, about 12-18m above the forest ground! They too are similar to human beings and dislike sleeping in soiled resting areas!

Go early around 8.30am to witness the active orangutans during their feeding session. It took us about an hour drive to get here from Kuching. 

4. You get to understand the local traditions at the Sarawak Cultural Village

_DSC0191.jpg

Traditional dwelling of the local ethnic group in Sarawak

Albeit being quite touristy, it’s still quite an eye-opener and a great introduction to all the different ethnic groups in Sarawak and the type of longhouses that they stay in. The ethnic groups consists of the Malays, Chinese, Iban, Bidayuh, Orang Ulu, Melanau and other minor tribes living together in harmony in Sarawak.

I used to be quite ignorant and assumed that there are only Malays or Chinese living in Malaysia! And interestingly, according to our local guide, 44% of the population in Sarawak are Christians!

_DSC0207.jpg

Freshly made locals snacks available for sale at each station! A must try!

Each ethnic group has their own traditions and believes. The Ibans, comprising the largest percentage of Sarawak’s population, are famous for being excellent headhunters. They used to collect human skulls and hang them high up in their living room as a record of their past victories. The skulls will then be smoked for 24 hours non stop because of their superstitious belief.

_DSC0190.jpg

Inside the living room of a Iban longhouse, see that smoke? The human skulls used to be hung above it.

The purpose of this cultural village was to preserve and showcase Sarawak’s cultural heritage to the rest of the world. At the Cultural Village, you will receive a passport where you can get it stamped at each station (longhouse) and you can keep it as a souvenir once you’re done. There is also a 45mins theatre performance which demonstrates the local’s way of living as well as their cultural dance.

_DSC0212.jpg

Entertaining cultural performances put up by the locals

We stayed at the Damai Beach Resort which was less than 5 minutes away from the Sarawak Cultural Village. Very cozy resort with a great view of the beach! It takes about 45minutes drive from Kuching to get here. 

_DSC0233.jpg

Thank you Damai Beach Resort for hosting us!

_DSC0218.jpg

Very comfy and spacious rooms

5. You get to visit a traditional longhouse

_DSC0603.jpg

A authentic longhouse that has 30 different families living in it together!

A longhouse is the traditional housing of the local people and even up till today, there are still people living in longhouses. It’s literally a really long house made up of 30-50 rooms with a family staying in each room. There is a communal walkway outside the rooms for the families to interact and chill together.

Sometimes they will have a meal together and each family will contribute their own food and resources, kinda similar to pot luck. Also if any of the families need help, the rest of the families will chip in and help each other. We really appreciated this communal style of living, feels like everyone is very eager to help and share with one another.

_DSC0614.jpg

A traditional welcome dance by the local!

_DSC0650.jpg

Trying out a blowpipe, not easy man! Amazing how they used to hunt with this!

From Batang Ai Resort, we took a long boat to the traditional Iban Longhouse for a lunch visit. If you’re travelling on your own or if you guide forgets, please remember to bring a gift for the children of the longhouse (not forgetting that there are at least 30 families living there!).

Usually for the gift, it’s advisable to get multi-pack snacks so that they can be easily distributed to each family. Apparently some tourists brought only 1 ball as a gift and you can imagine, all the children fighting over that 1 ball!

_DSC0629.jpg

Distribution of the gifts from tourists to the 30 families living in this longhouse

Tip: Do remember to slap on lots and lots of sunblock whenever you’re on a long boat! No shade at all and with the unrelenting sun, you can be assured of a more than beautiful tan once you get off the boat.

Trekking is also available at the vicinity of the longhouse but as we didn’t have the luxury of time, we only did a really short 30 mins trek. But otherwise, there are longer treks available as well if you’re planning on spending more time at the longhouse. Do wear long pants as there are many fish bone ferns along the trek which can cause some nasty scratches!

We stayed at Aiman Batang Ai Resort & Retreat, which was really remote and tranquil. It took us 5 hours drive to get here from Kuching. The resort was built to resemble a longhouse. Do check out the amazing sunset view at the lake! 

_DSC0556.jpg

At Batang Ai resort, tucked away from the hustle bustle of the city!

_DSC0481.jpg

Super cozy room!

6. Explore the Mystical Fairy Cave and Wind Cave

_DSC0018.jpg

Inside the magical Fairy Cave

We are both cave lovers and always enjoyed exploring different caves whenever we travel. We’ve seen numerous caves during our past travels, but the caves here in Sarawak are nothing like the ones we’ve seen before.

There is a flight of stairs to climb before reaching the entrance of the fairy cave. The cave is really huge and what we liked most about it was that it felt very untouched. There isn’t any artificial light installed within the cave and visibility was dependent on natural sunlight and our torches. Apparently the local people used to visit the cave to pray to the Guan Yin statue that has been formed by the stalactites. The people also built this small fairy statue inside the cave and they worship it too.

_DSC0017.jpg

Fairy statue in the middle of the Fairy Cave where the locals used to worship

For the wind cave, it was definitely much smaller than the fairy cave and had lower ceilings. The ceilings were so low that you could easily spot the bats! Some of them were literally just in front of your eyes! Quite an interesting experience if you’ve never seen bats up-close before.

_DSC0122.jpg

Close up of the bats! They’re quite cute aren’t they?!

It took us about an hour drive to get here from Kuching and you can actually visit the caves together with a visit to the Gunang Gading National Park in the same day since they’re both located nearby. 

7. Delight Your Taste Buds With Palactable Local Food

_DSC0705.jpg

Absolutely delicious kolo mee!! Ahhhh!!!

This has gotta be my highlight of Kuching! The food here in Sarawak is AMAZING! I especially love their kolo mee and the famous 3 layered tea (teh c peng special). It’s similar to the teh peng in Singapore but they use palm sugar instead of condensed milk. Just typing this now is enough to make me salivate. Sarawak is also very famous for their laksa which tastes very similar to mee siam in Singapore. We still prefer our Singapore laksa which has more coconut oil. Of course there is a lot more must try local food which deserves a post on its own (coming soon)!

_DSC0147.jpg

The must try 3 layered tea in Sarawak!

Essential Information

Where we stayed in Kuching

_DSC9865.jpg

We stayed at Riverside Majestic Hotel which was just 5 mins away from the waterfront!

Its location was excellent as it’s just opposite the river and walking distance to the main bazaar, open air market, etc. The rooms were extremely comfy and the food was delicious! You have to try their buffet dinner which costs only about MYR99 per pax which works out to S$30. The buffet spread was very wide and they serve from Japanese food to local traditional food!

How did we get here from Singapore

We flew via Malaysia Airlines from Singapore direct to Kuching. The flight duration was only 1 hour 25 minutes.

How did we arrange the above tours

Most of the above places were really difficult to get there on your own as there’s hardly any public transport. You will probably have to charter your own taxi if you’re planning on getting there yourself. We did the tours with Amazing Borneo who settled everything from the accommodation to getting us to the attractions. This is our third time with Amazing Borneo and their service has never failed to disappoint us.

Thank you Amazing Borneo for arranging the tours in Sarawak for us! 


Top 5 Most Overrated Cities in Turkey That You Should Not Visit

Top 5 Most Overrated Cities in Turkey That You Should Not Visit

Turkey is definitely one of the most beautiful countries that we have ever gone to. The following cities have been highly raved by many and indeed, they’ve lived up to their hype.

1. Stunning Istanbul

Istanbul, the charming city connecting both Europe and Asia. Although it’s said to be over-commercialised by many, we really enjoyed our time in Istanbul! We were so impressed by the grandeur and complexity of the magnificent mosques’ architecture.

Fun fact: The Blue Mosque’s real name is actually Sultan Ahmed Mosque. It’s nick named Blue Mosque because of the blue tiles adorning the interior of the mosque. 

FV7A6790.jpg

Gina in awe of the beautiful Blue Mosque in Istanbul

FV7A6714.jpg

We were really blown away by the amazing architecture of the Basilica Cistern in Istanbul

2. Captivating Cappadocia

Cappadocia, our ultimate favourite out of all the places that we’ve been to in Turkey! How can anyone not fall in love with Cappadocia? Most of all, we really enjoyed staying in the cave hotel and hiking in the valleys! The bizarre lunar landscape was what captivated us the most.

FV7A4802.jpg

Staying in Gamirasu Cave hotel was one of best hotel experiences ever!

FV7A5379.jpg

The famous 3 sisters rock of Cappadocia!

3. Romantic Pammukale

Sadly though, this place has become really popular with tourists over the recent years and the original white cotton castle of Turkey has now become somewhat murkish and tainted. But still, it’s really pretty and romantic!

Tip: Head there during the late afternoon and enjoy the sunset while the crowd dies down. 

FV7A6393.jpg

Enjoying the sunset at the Cotton Castle of Turkey!

G0071532

During certain timings of the day, the pools will appear bluish in colour against the white calcium structures!

4. Ancient Ephesus

All history buffs will love Ephesus, the ancient city that was built back in the 10th century BC! This place is mostly ruins but it was fun imagining how bustling it must have used to be.

Tip: If you have the budget, it might be worth getting a guide to help makes sense of all the ruins. We went without one and was quite lost after awhile. 

FV7A6485.jpg

The majestic ancient ‘Library of Celsus’ in Ephesus

FV7A6479.jpg

This used to be an 1,500 seats indoor theatre with a wooden roof!

5. Gorgeous Oludeniz

A little touristy, but hey, the views from above were UH-MAZINGGG! We highly recommend paragliding in Oludeniz, just check out the unbelievably blue waters. A pity it was still too cold for us to swim in the sea when we were there.

Tip: Visit Oludeniz during Spring/Summer, the beaches would probably be amazing to swim in during that period!

GOPR59691

Paragliding in Oludeniz – highly recommended!

lycian

Starting the Lycian Way trek from Oludeniz

So there you go, there’s a reason why the above cities have been overrated by tons of travellers. You be your own judge and decide if you’d still want to visit them! You can surely find any of the above cities in any standard tour package for Turkey. But if you have time, don’t miss out on the hidden gems off the beaten path of Turkey that most people don’t know about!